Installation
Run these three commands to install DeQ:
wget https://github.com/deqrocks/deq/releases/latest/download/deq.zip
unzip deq.zip -d deq && cd deq
sudo ./install.sh
What the installer asks
- Server IP - Your LAN IP (auto-detected). Used for the access URL.
- Port - Default is 5050. Change if that port is in use.
What the installer does
| Step | What happens |
|---|---|
| Create directories | Creates /opt/deq/ for the application and fonts |
| Copy files | Copies server.py and fonts to /opt/deq/ |
| Create systemd service | Installs /etc/systemd/system/deq.service so DeQ starts automatically on boot and restarts on crash |
| Create initial config | Creates /opt/deq/config.json with your host device pre-configured |
| Start service | Enables and starts the DeQ service |
First Steps
- Open your DeQ URL in a browser
- Click the pencil icon (top right) to enter edit mode
- Click + to add links or devices
- Click existing items to edit them
- Drag items to reorder
- Click the eye icon to hide sections you don't need
- Scroll down to customize the theme
The server running DeQ is automatically added as "Host" with local system stats.
SSH & Remote Access
For secure remote access, use Tailscale or another VPN. SSH access enables stats display and remote shutdown for devices.
# Generate a key (skip if you have one)
ssh-keygen -t ed25519

# Copy to your device
ssh-copy-id user@device-ip

# DeQ runs as root, copy the key there too
sudo cp ~/.ssh/id_ed25519* /root/.ssh/
sudo chmod 600 /root/.ssh/id_ed25519

# Test the connection
sudo ssh user@device-ip 'echo OK'
Enable Passwordless Sudo
DeQ uses sudo for power control and SMART disk monitoring. If your SSH user isn't root, run this command on the target device:
echo "$USER ALL=(ALL) NOPASSWD: /usr/bin/systemctl poweroff, /usr/bin/systemctl suspend, /usr/sbin/smartctl" | sudo tee /etc/sudoers.d/deq
sudo chmod 440 /etc/sudoers.d/deq
This grants access only to power commands and disk health monitoring, nothing else.
Security
DeQ runs as root and provides full filesystem access through the file manager. This is by design - the security model is "trusted tool on a trusted network."
- Optional password protection - Set an admin password to prevent unauthorized access on your local network.
- Runs as root - Required for Wake-on-LAN (raw sockets), SSH to other devices, and reading system stats.
- The code is auditable - All 350KB of it. You can read exactly what DeQ does in an afternoon.
- No external connections - DeQ only listens on your configured port. It doesn't phone home or connect to any external servers.
- Config is local - All settings are stored in
/opt/deq/config.json. No cloud, no accounts.
Admin Password
Protect DeQ with a password. Useful if others on your network shouldn't have access.
# Set or change password
sudo ./install.sh --set-password

# Remove password (disable auth)
sudo ./install.sh --remove-password
When set, a login screen appears before accessing DeQ. Sessions persist until you click the logout button or change the password.
For secure remote access, we still recommend using Tailscale or another VPN.
For a detailed explanation of why DeQ rejects Docker and runs as root, see Why no Docker? in the FAQ.
Disclaimer
DeQ is provided "as is" without warranty of any kind. The authors are not liable for any damages resulting from its use. By installing and using DeQ, you accept full responsibility for:
- Securing your network and system
- Restricting access via VPN (Tailscale, Wireguard, etc.)
- Any damages resulting from misconfiguration or unauthorized access
Never expose DeQ directly to the public internet.
Adding Links
Links are bookmarks to your services. Each link has a name, URL, icon, and optional note. Drag & drop to reorder.
Icon Options
| Format | Example | Description |
|---|---|---|
| Lucide | server |
Default icon set. See lucide.dev/icons |
| Dashboard Icons | dash:proxmox |
App icons. See dashboardicons.com |
| Custom URL | https://... |
Any image URL |
Click the palette icon to toggle monochrome mode for all icons.
Adding Devices
Manually
Enter edit mode → go to the Devices section → click "+". After adding the device, you can manually add containers or scan for containers running on that device.
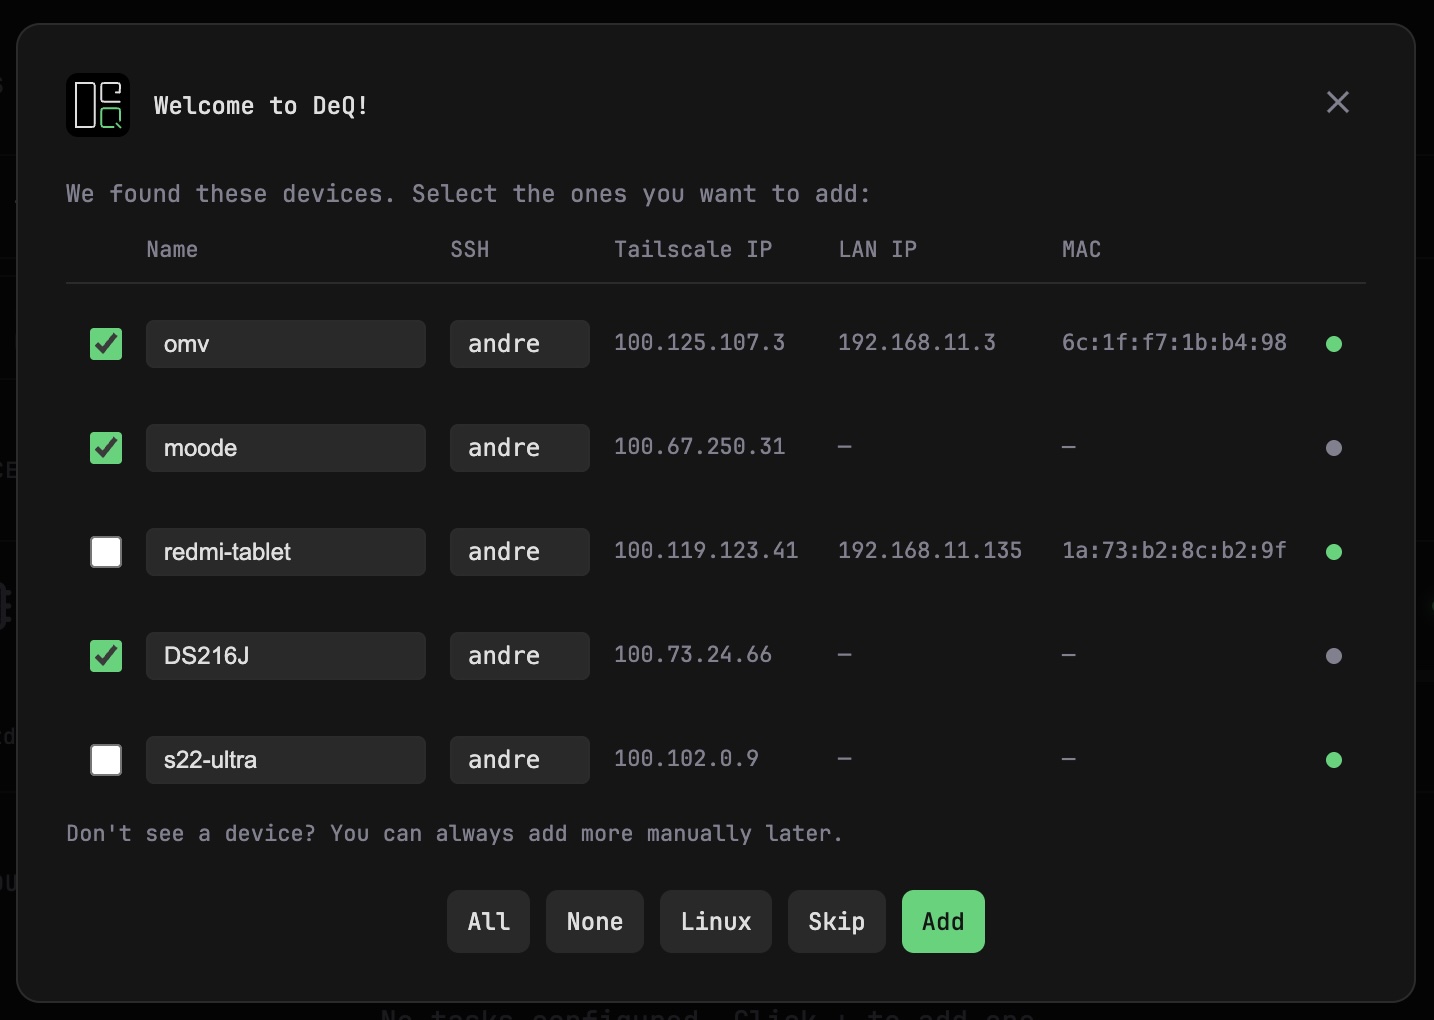
Using the Wizard
You can automatically discover devices and containers: enter edit mode → go to the Devices section → click the scan icon (radar). The wizard will scan your network for Tailscale peers and devices in your ARP cache. Add SSH usernames and it will scan for Docker containers on each device. Make sure SSH key authentication is set up for this to work.
Device Features
Each device can have:
| Feature | Description |
|---|---|
| Wake-on-LAN | Power on the device remotely (requires MAC address) |
| Quick Connect | Buttons for RDP, VNC, or web interfaces |
| Docker | Scan for containers or add manually, start/stop, optional connection buttons |
| SSH | Enables stats display and remote shutdown |
IP Address Configuration
Local IP (in device settings): Your LAN IP (e.g., 192.168.x.x). Used by DeQ for Wake-on-LAN, SSH, and ping checks.
Quick Connect IPs: The IP your browser uses to connect. Use LAN IPs at home, or Tailscale IPs for remote access.
Example with Tailscale:
- Device Local IP:
192.168.1.100(for WOL/SSH) - Docker VNC:
100.x.x.x:8006(Tailscale IP for remote access)
Adding Scripts
Run shell scripts directly from the web interface. Scripts live in /opt/deq/scripts/ on the DeQ host. DeQ scans this directory and offers discovered executables as clickable actions.
Creating Scripts
# Create a script
sudo mkdir -p /opt/deq/scripts
sudo nano /opt/deq/scripts/docker-prune.sh

# Make it executable
sudo chmod +x /opt/deq/scripts/docker-prune.sh
In edit mode, click the scan button in the Scripts section to discover new scripts.
Configuration
After discovery, configure each script with:
| Setting | Description |
|---|---|
| Name | Display name (prefilled with filename) |
| Icon | Lucide icon (same as Links) |
| Note | Optional note shown below the name |
Drag & drop to reorder scripts in the UI.
Execution
Click a script to run it. DeQ executes the script on the host and shows a toast with the result.
- Timeout: 30 seconds hard limit
- Working directory:
/opt/deq/scripts/ - Exit code 0: Success (green toast)
- Exit code ≠ 0: Error (red toast)
Security
- Scripts must be placed manually via SSH/SCP
- No remote editing or free command input through the UI
- DeQ only discovers and triggers scripts
- Scripts run with the same permissions as DeQ (root)
Community Scripts
Browse ready-made scripts in /community scripts/ on GitHub.
Contributing
If you built a useful script, consider sharing it with the community.
What works well: Backup automation, Docker maintenance, system cleanup, custom monitoring.
How to share:
- GitHub: Fork the repository, add your script to
/community scripts/, open a PR. Seecontribution.mdin that folder for guidelines. - Email: Zip your script and send it to dev@deq.rocks.
Scheduled Tasks
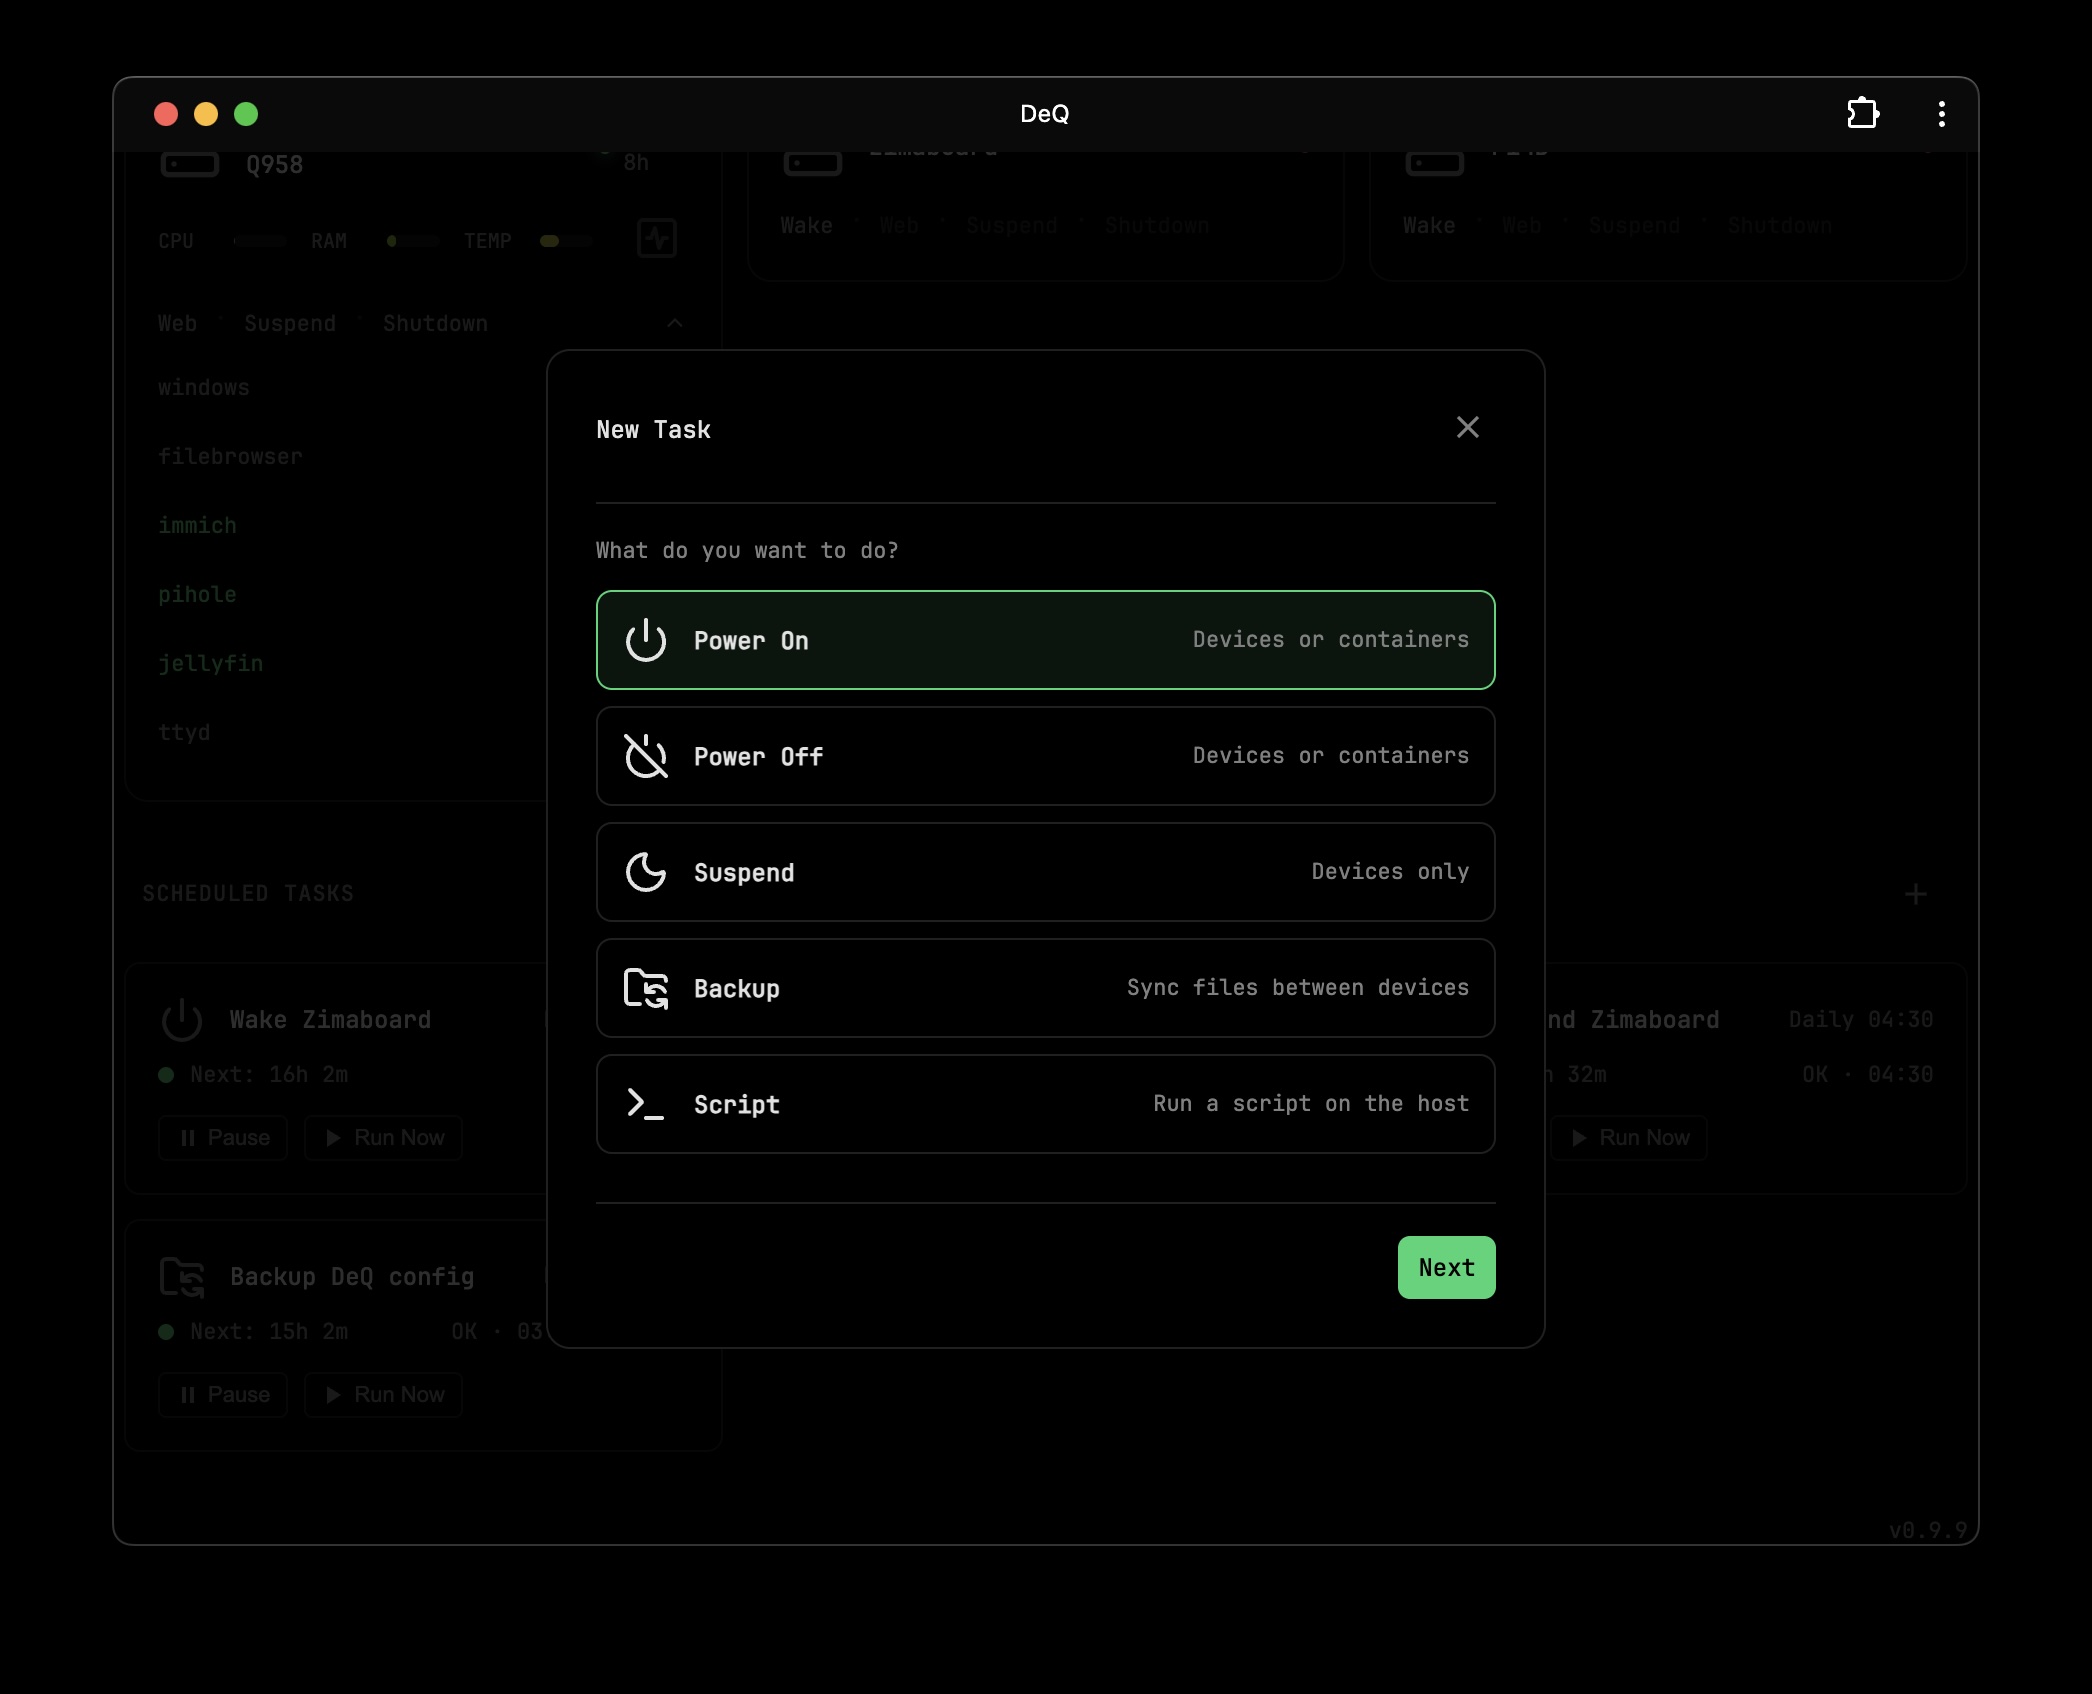
Automate recurring operations with a step-by-step wizard. In edit mode, click the + button in the Scheduled Tasks section.
Task Types
| Type | Description |
|---|---|
| Power On | Wake a device via WoL or start a Docker container |
| Power Off | Shutdown a device via SSH or stop a Docker container |
| Suspend | Put a device to sleep (devices only) |
| Backup | Sync files between devices using rsync |
| Script | Run a script from /opt/deq/scripts/ |
Schedule Options
- Hourly - Runs every hour
- Daily - Runs at a specific time each day
- Weekly - Runs on a specific day and time
- Monthly - Runs on the 1st or 15th at a specific time
Backup Tasks
The wizard includes a folder browser. Select source and destination devices, then navigate to pick folders.
- Source: Click to select a folder, double-click to select its contents
- Destination: Double-click to navigate, click to select target
- Mirror mode: Deletes files from destination that no longer exist in source
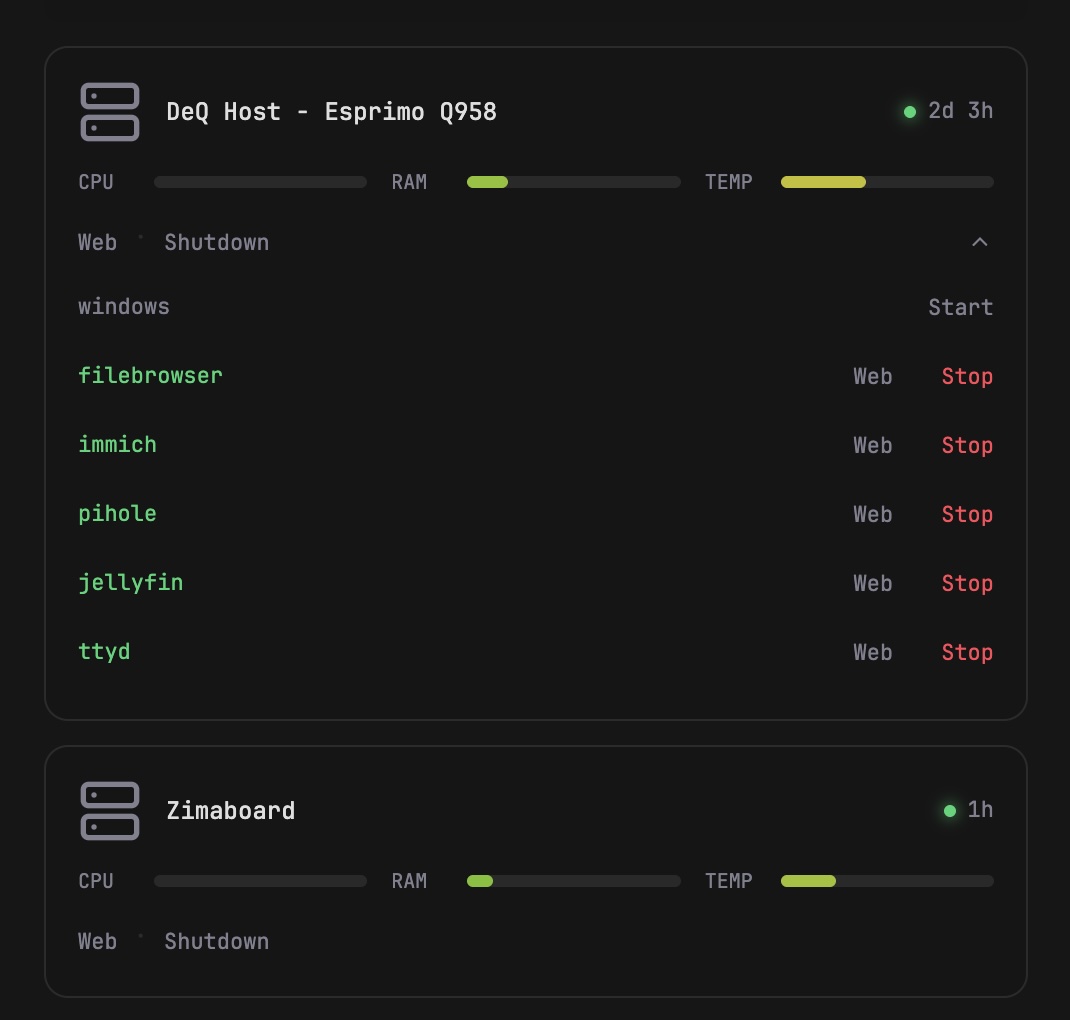
Task Cards
Each task shows its schedule, status, and last run result. The status indicator shows:
- Green - Last run successful
- Yellow - Skipped (e.g., source device offline)
- Red - Failed with error message
- Gray - Paused
Buttons let you pause/resume or run a task immediately. Drag & drop to reorder in edit mode.
Example workflow: Wake your NAS at 3 AM, run a backup, then shut it down automatically.
File Manager
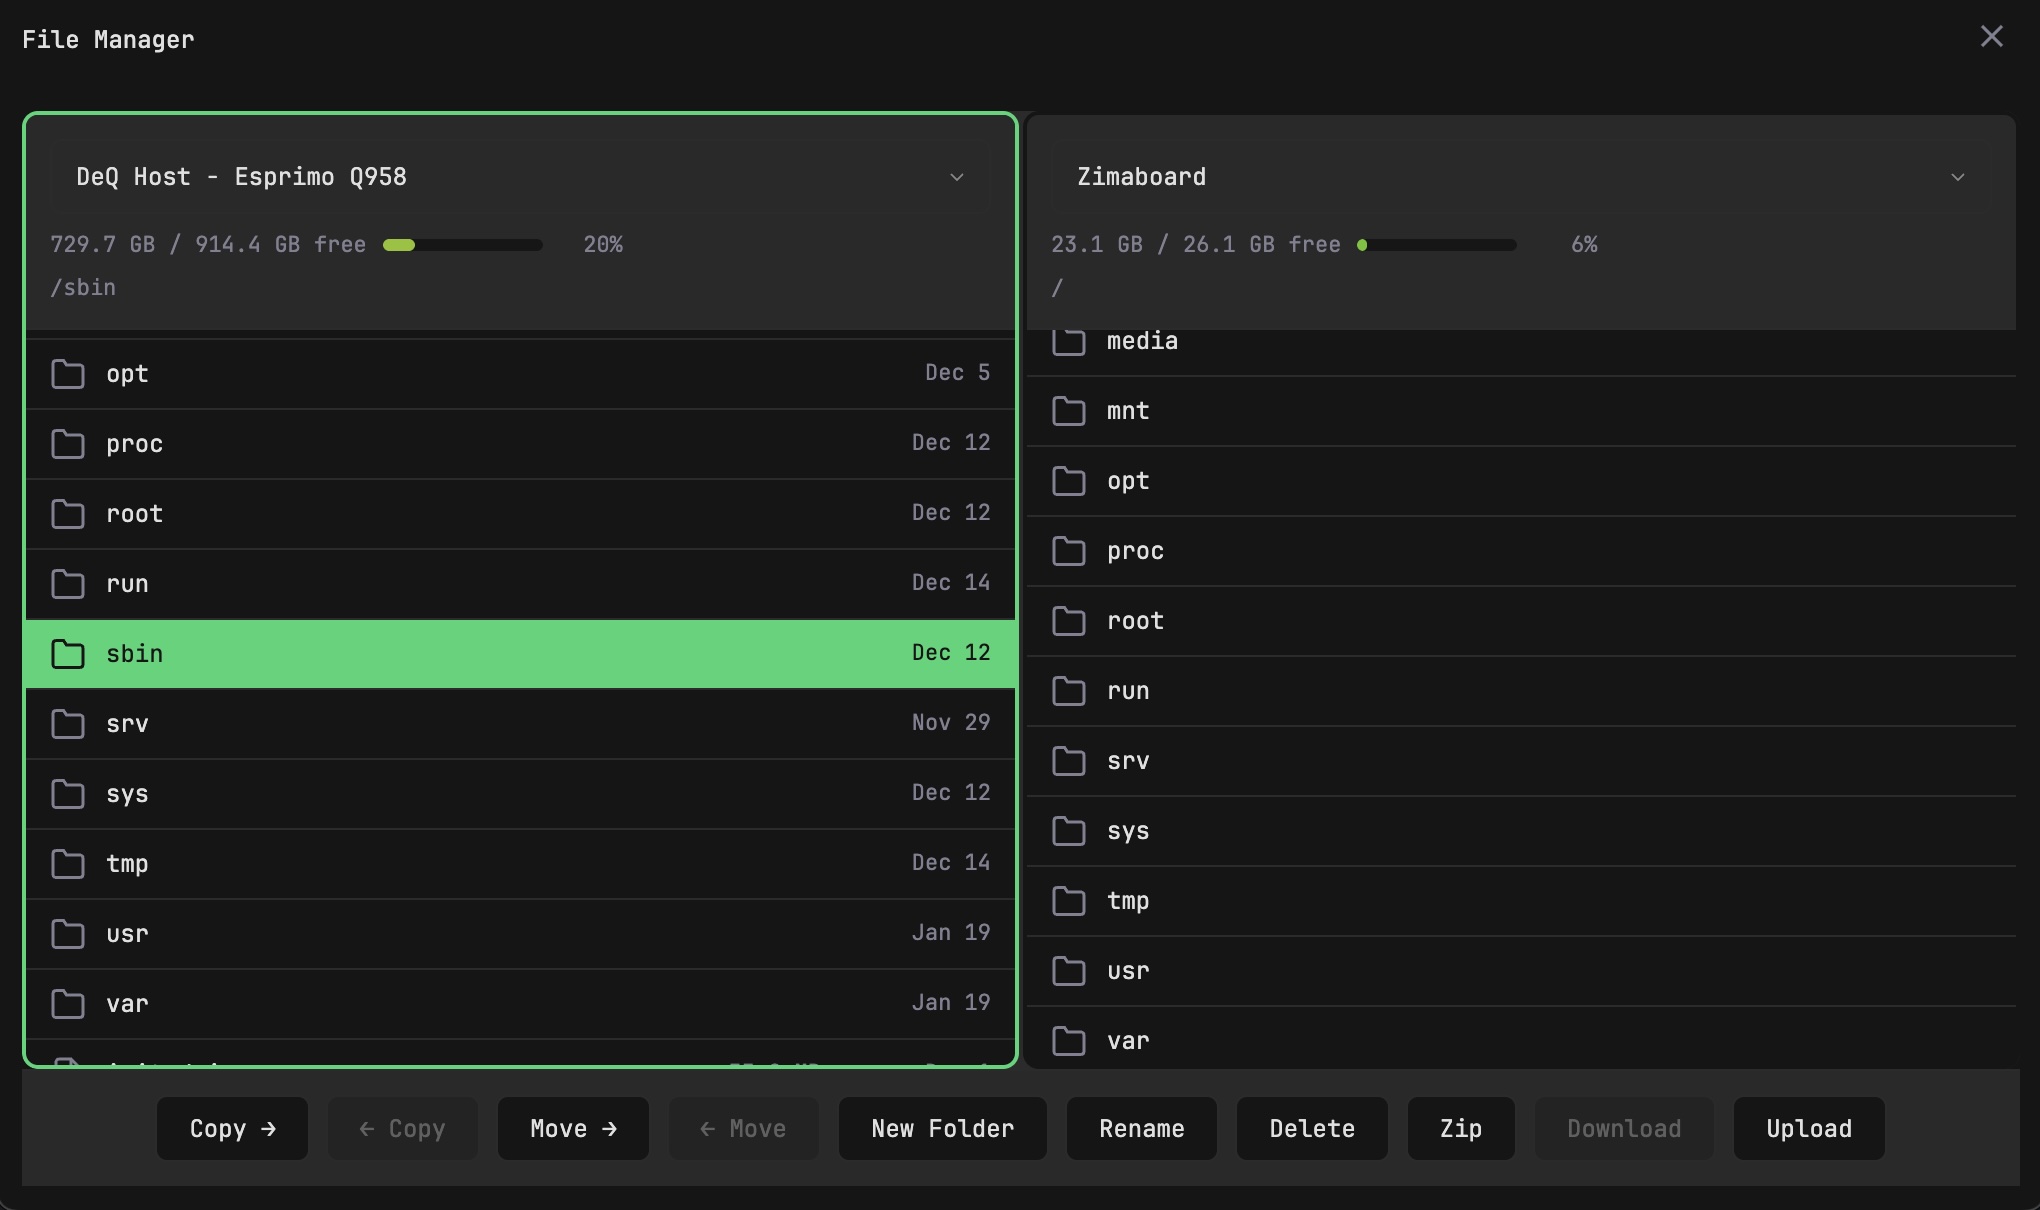
Click the folder icon (top right) to open the dual-pane file manager.
Features
- Copy and move files between devices
- Upload via button or drag & drop
- Download files directly
- Create new folders
- Create zip archives (or tar.gz as fallback)
- Rename and delete files
- Progress indicator with speed and ETA for large transfers
- Preflight checks (verifies free space before transfer)
- Remembers your last folder per device
Navigation
- Click to select a file
- Double-click to open folders
- Drag files from your desktop to upload
How transfers work
| Transfer type | How it works |
|---|---|
| Host ↔ Remote | Direct rsync over SSH |
| Same device | Direct copy on that device (no network transfer) |
| Remote ↔ Remote | Two-phase transfer via host (download to host, then upload to destination) |
Preflight checks
Before any transfer starts, DeQ performs preflight checks:
- Calculates source size
- Verifies destination is reachable and writable
- Checks free space at destination
- For Remote ↔ Remote: checks free space on host (used as intermediate storage)
If any check fails, you get an error message before the transfer attempts to start.
Progress tracking
Large transfers show real-time progress with speed and ETA. The transfer uses an idle timeout instead of a fixed timeout. If no progress is made for 5 minutes, the transfer is cancelled. This allows multi-TB transfers to complete while still catching stalled connections.
The file manager requires SSH access to remote devices.
Theming
In edit mode, scroll to the Theme section to customize:
| Setting | Description |
|---|---|
| Colors | Background, cards, borders, text, accent |
| Transparency | Card transparency (0-100%) |
| Blur | Background blur amount (0-30px) |
| Wallpaper | Any image URL (e.g., https://example.com/bg.jpg) |
Click "Reset to Defaults" to restore the original dark theme.
Mobile App
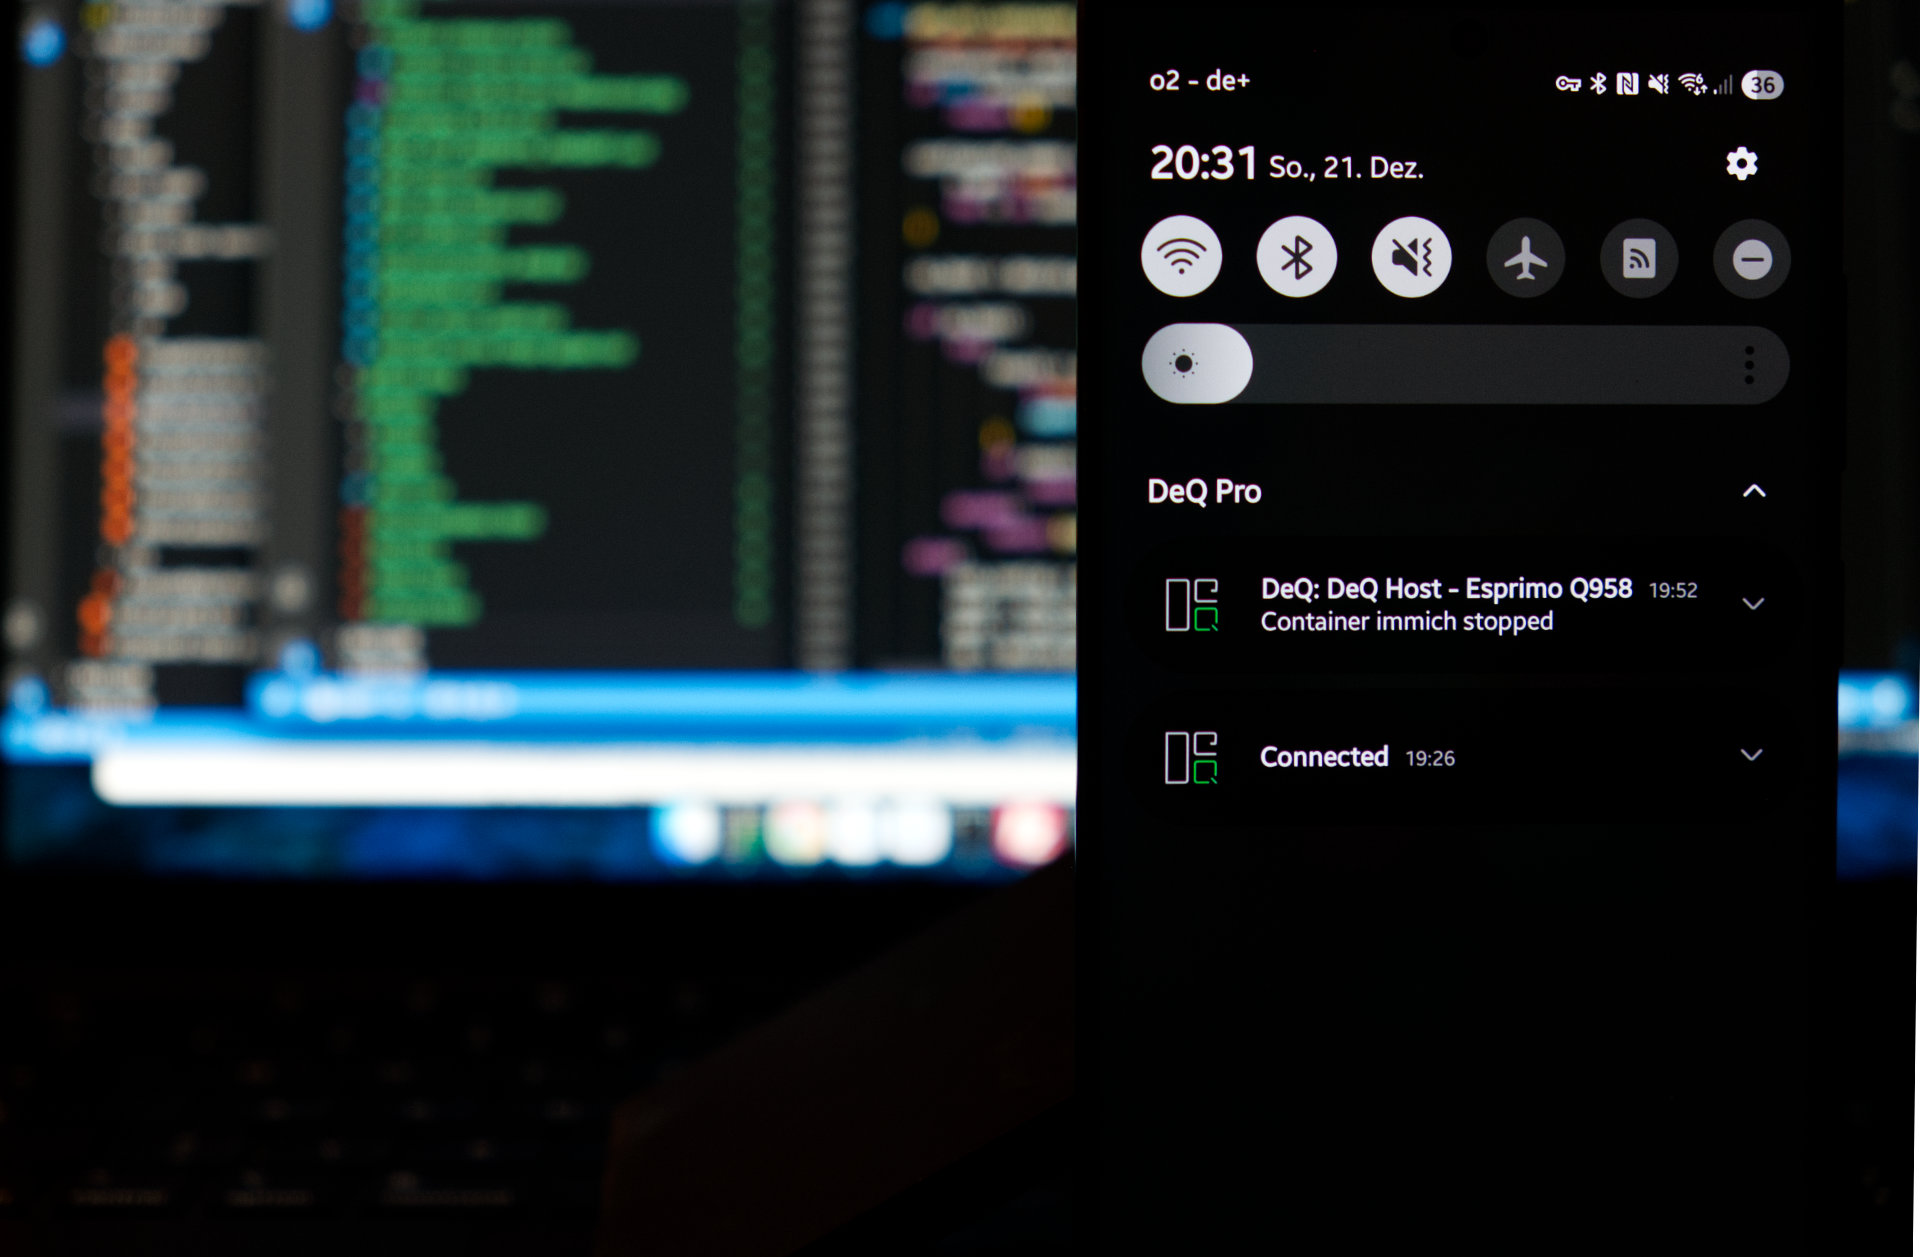
The app monitors your homelab in the background and alerts you when devices go offline or containers stop.
Android (Free)
Native Android app with clean web interface and push notifications for configurable eventsAd-free & compatible with Android 8+.
Setup
- Install the app from Google Play or download the APK
- Select HTTP or HTTPS
- Enter your DeQ server address (IP or Tailscale hostname)
- Enter the port (default: 5050)
- Tap Connect
- You will receive push notifications for server & container start/stops by default
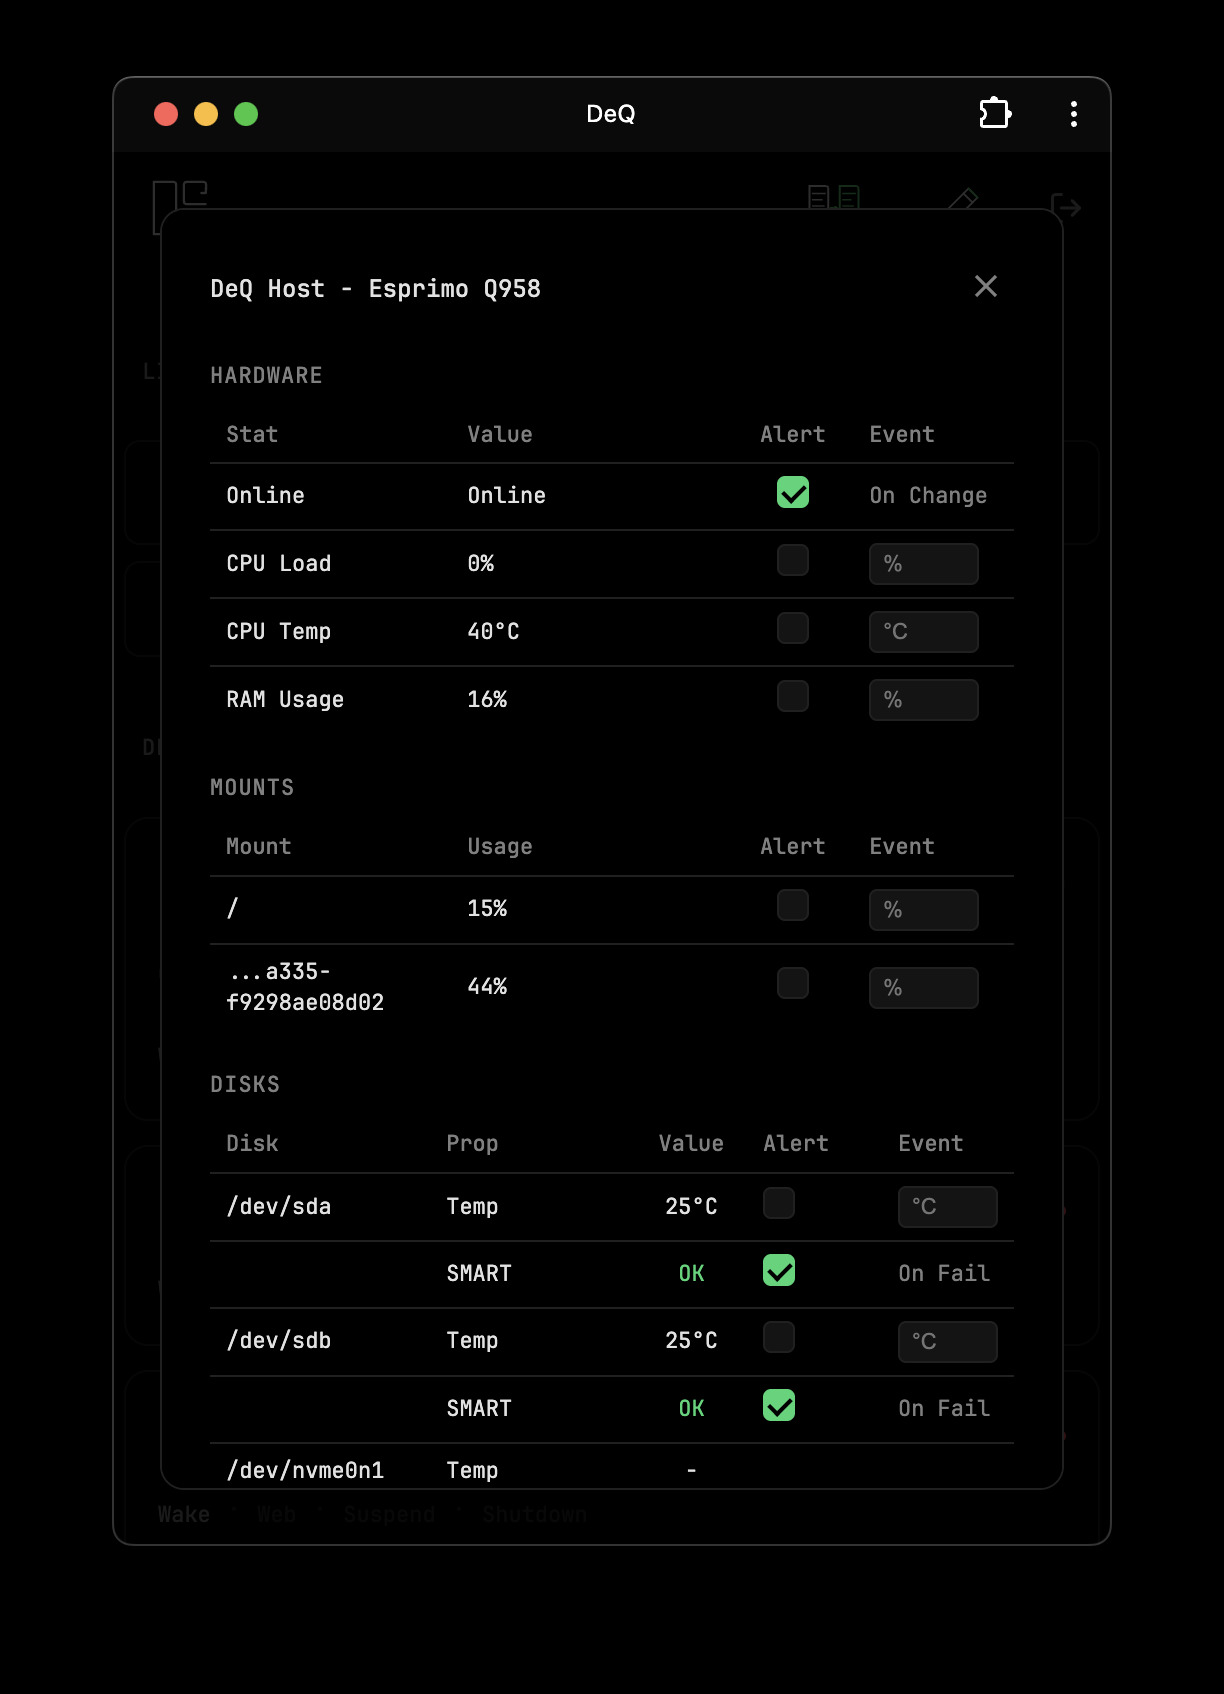
- Configure further alarm events and thresholds in the device stats panels
Android Pro
Adds widgets, live wallpaper, Android Auto, Wear OS, and automation features.
| Feature | Free | Pro |
|---|---|---|
| WebView Interface | ✓ | ✓ |
| Ambient Mode Interface | ✗ | ✓ |
| Push Notifications | ✓ | ✓ |
| DeQ Nodes | ✓ | ✓ |
| Background Polling | 30 min | custom |
| Home Screen Widgets | ✗ | ✓ |
| Lock Screen Widgets | ✗ | ✓ |
| Live Wallpaper | ✗ | ✓ |
| Screen Saver | ✗ | ✓ |
| Android Auto | ✗ | ✓ |
| Sleep With Me | ✗ | ✓ |
| Wear OS | ✗ | ✓ |
Widgets
DeQ Pro App includes 5 widget styles:
| Widget | Description |
|---|---|
| DeQ Less | Minimal colored dots - green/gray for online/offline |
| DeQ List | Scrollable list with device names and stats |
| DeQ Ultra | Q-symbols: rotated = online, normal = offline |
| DeQ Mega | Green squares for online devices only |
| DeQ Containers | Green circles for running containers only |
All widgets support custom background color, transparency, and corner radius.
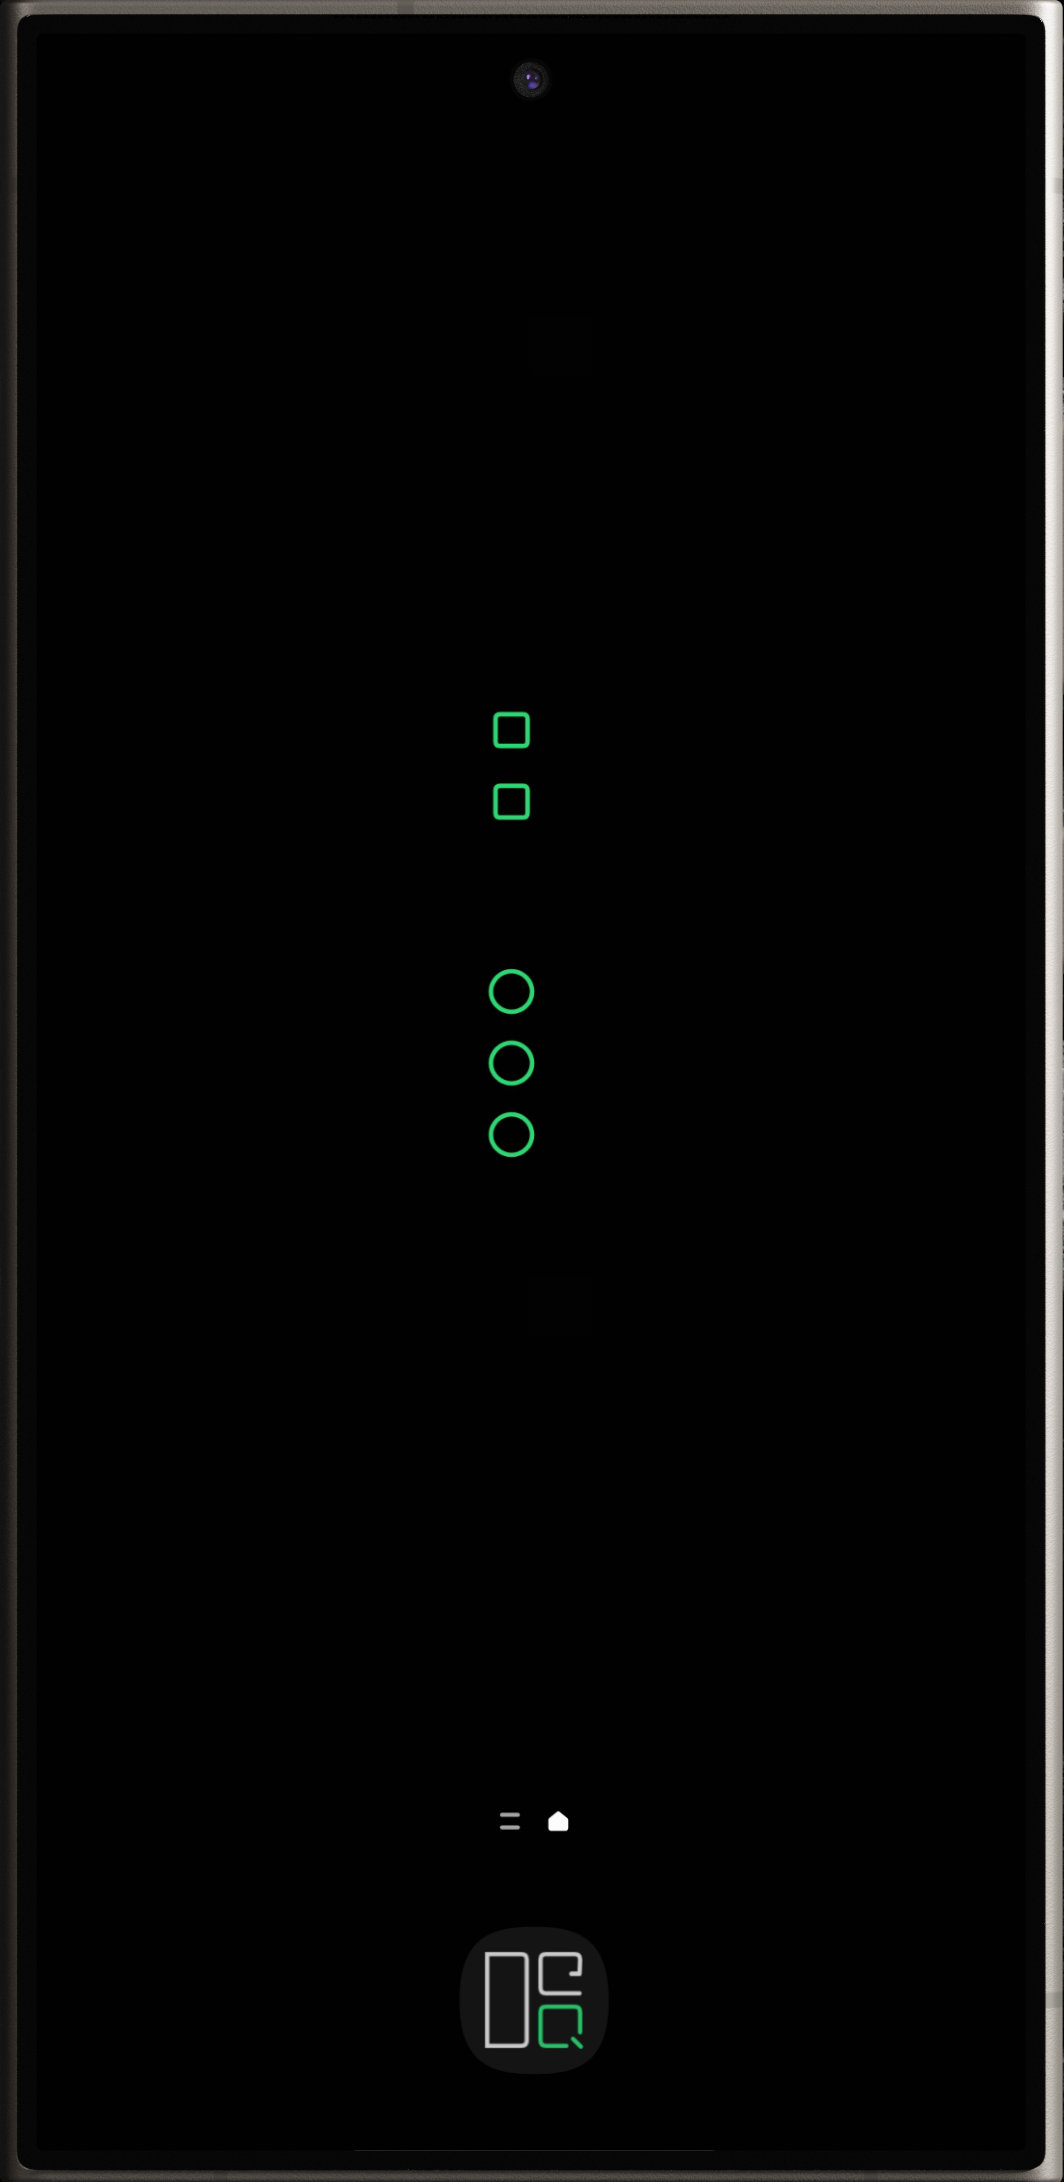
Live Wallpaper & Screen Saver
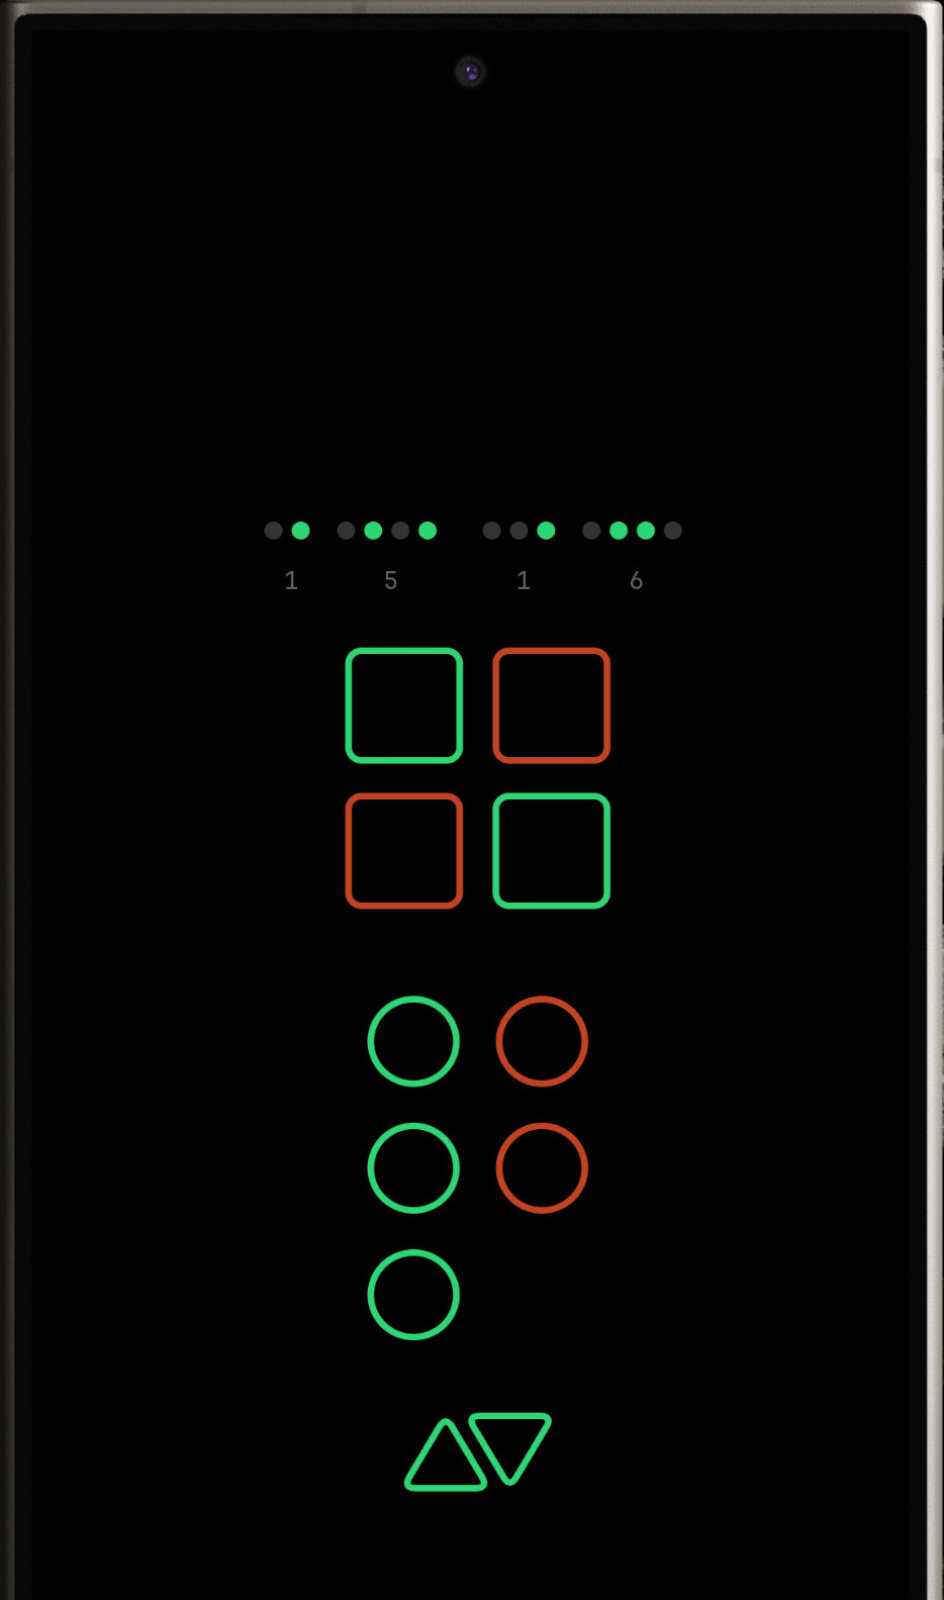
Turn an old phone into a wall-mounted status display. DeQ Live shows animated device squares and container circles. DeQ Ambient is a screen saver with BCD clock and OLED burn-in protection. Colors indicate status: gray = offline, green → red = CPU load.
Android Auto
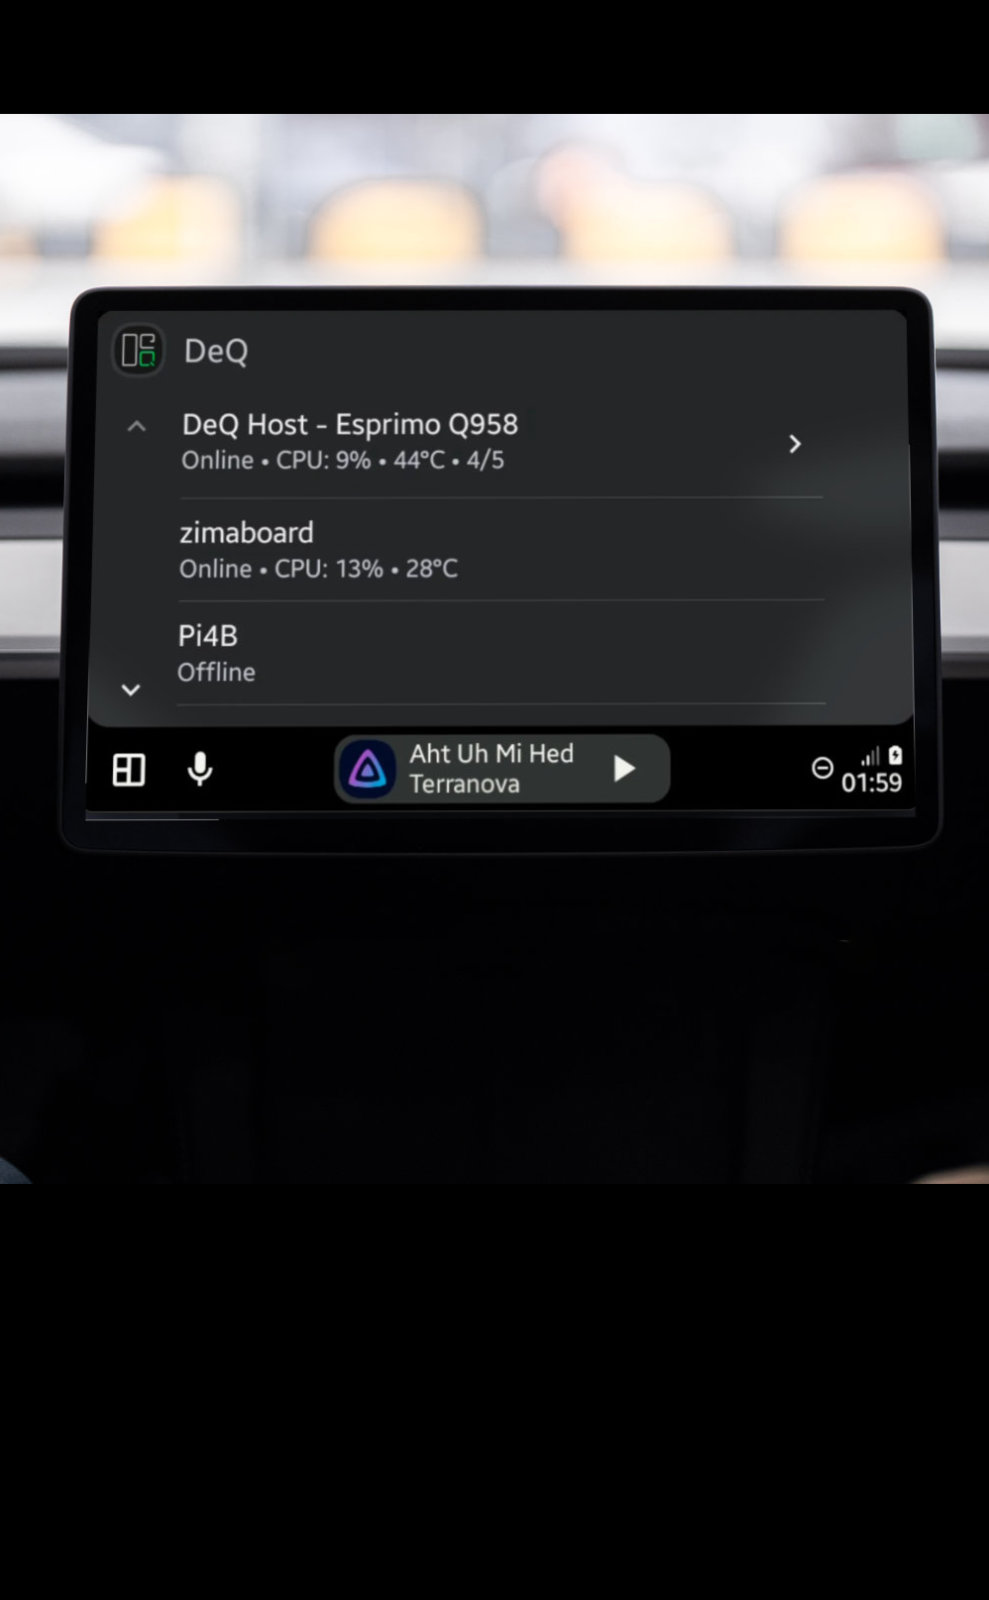
Check your homelab status from your car's dashboard. Android Auto support is included in the DeQ Pro app and works automatically when you connect your phone to your car.
Wear OS
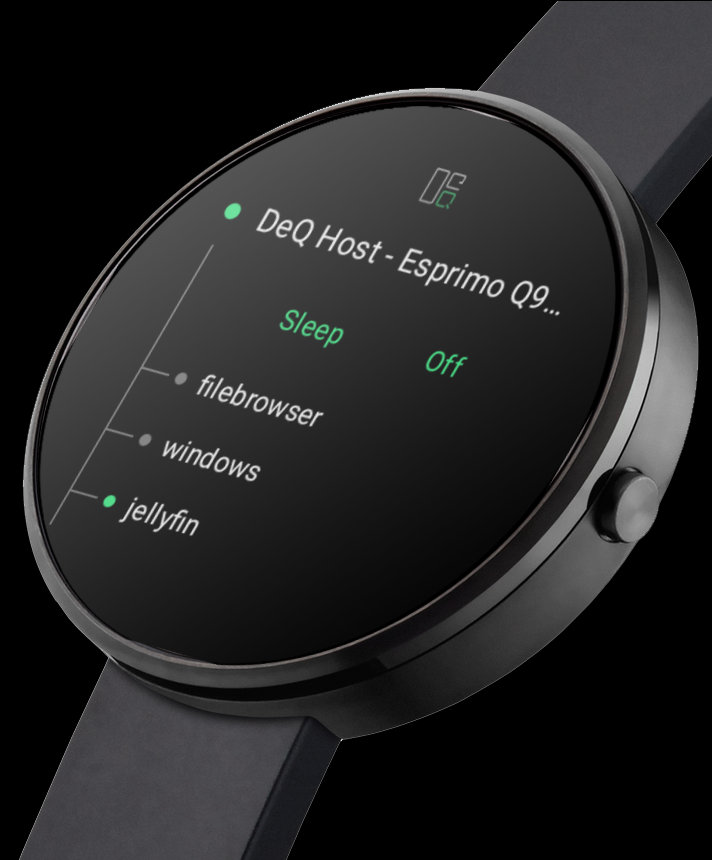
Control your homelab from your wrist. The Wear OS app is a separate install on your watch but syncs automatically with the DeQ Pro App on your phone.
- Watch App: View devices and containers, wake/sleep/shutdown devices, start/stop containers
- Tile: Quick status overview showing online devices and running containers
- Complications: Add device or container count to any watch face
Requirements: Wear OS 3.0+ (Galaxy Watch 4 or newer, Pixel Watch, etc.) and the DeQ Pro App on your phone.
Sleep With Me
Pro feature - Automatically put devices to sleep and stop containers when you go to bed, wake them up when you get up.
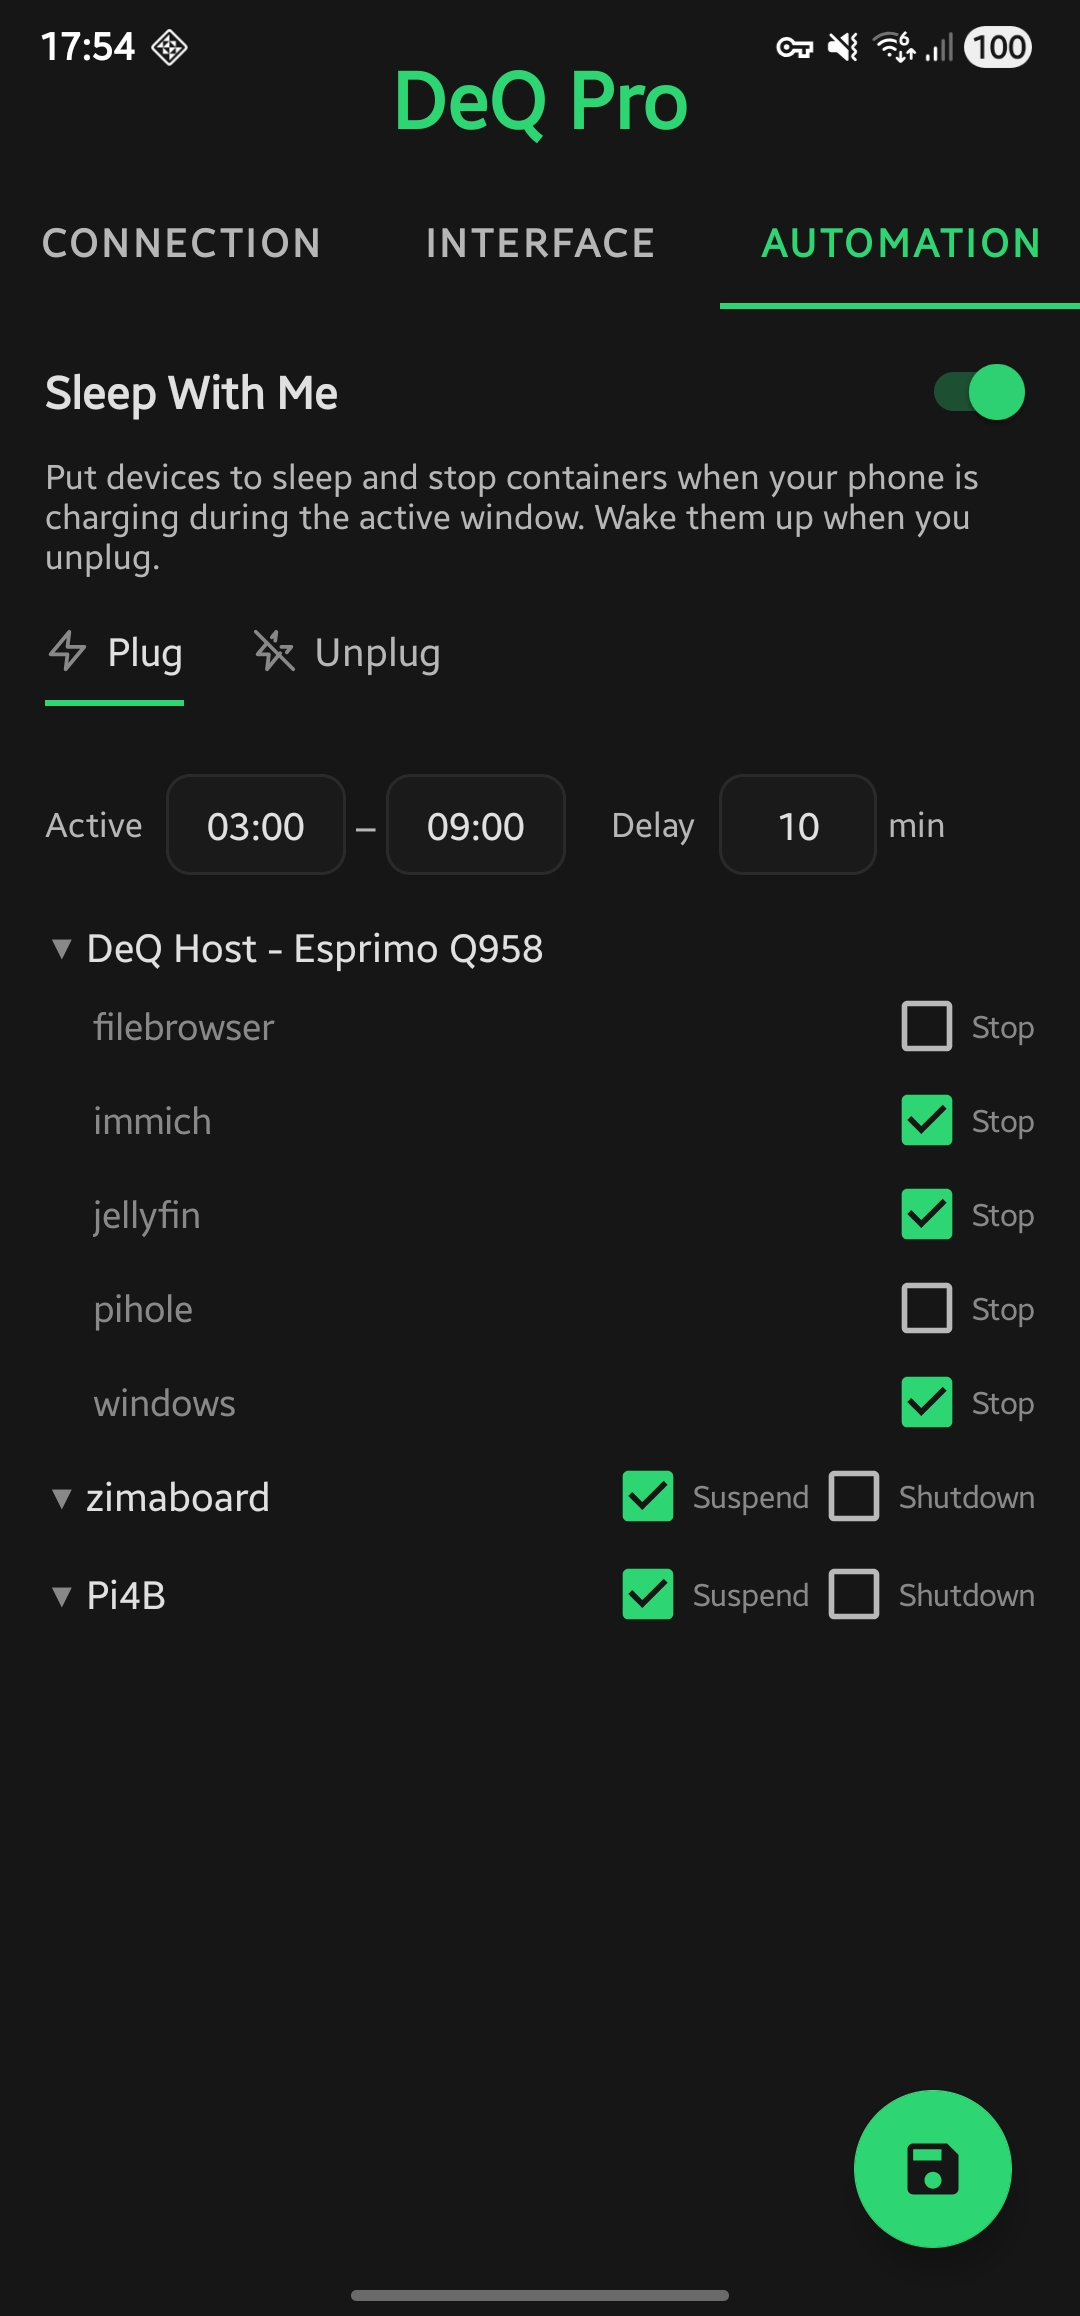
How it works
Sleep With Me uses your phone's charging state as a trigger:
- Plug in your phone at night → Selected devices suspend/shutdown, containers stop
- Unplug in the morning → Selected devices wake up (via WoL), containers start
The feature checks at the start of the active window - so even if you plug in before bedtime, your devices won't sleep until the window begins.
The DeQ host server itself can be part of the sleep sequence. It will be suspended or shut down last, ensuring all other operations complete first. On wake, the app uses WoL directly (home network) or via a configured Node (remote).
Configuration
| Setting | Description |
|---|---|
| Active Window | Time range when Sleep With Me is active (e.g., 22:00 - 08:00) |
| Delay | Minutes to wait after plugging in before executing (gives you time to unplug if needed) |
| Plug tab | Select which containers to stop and devices (including the server) to suspend or shutdown |
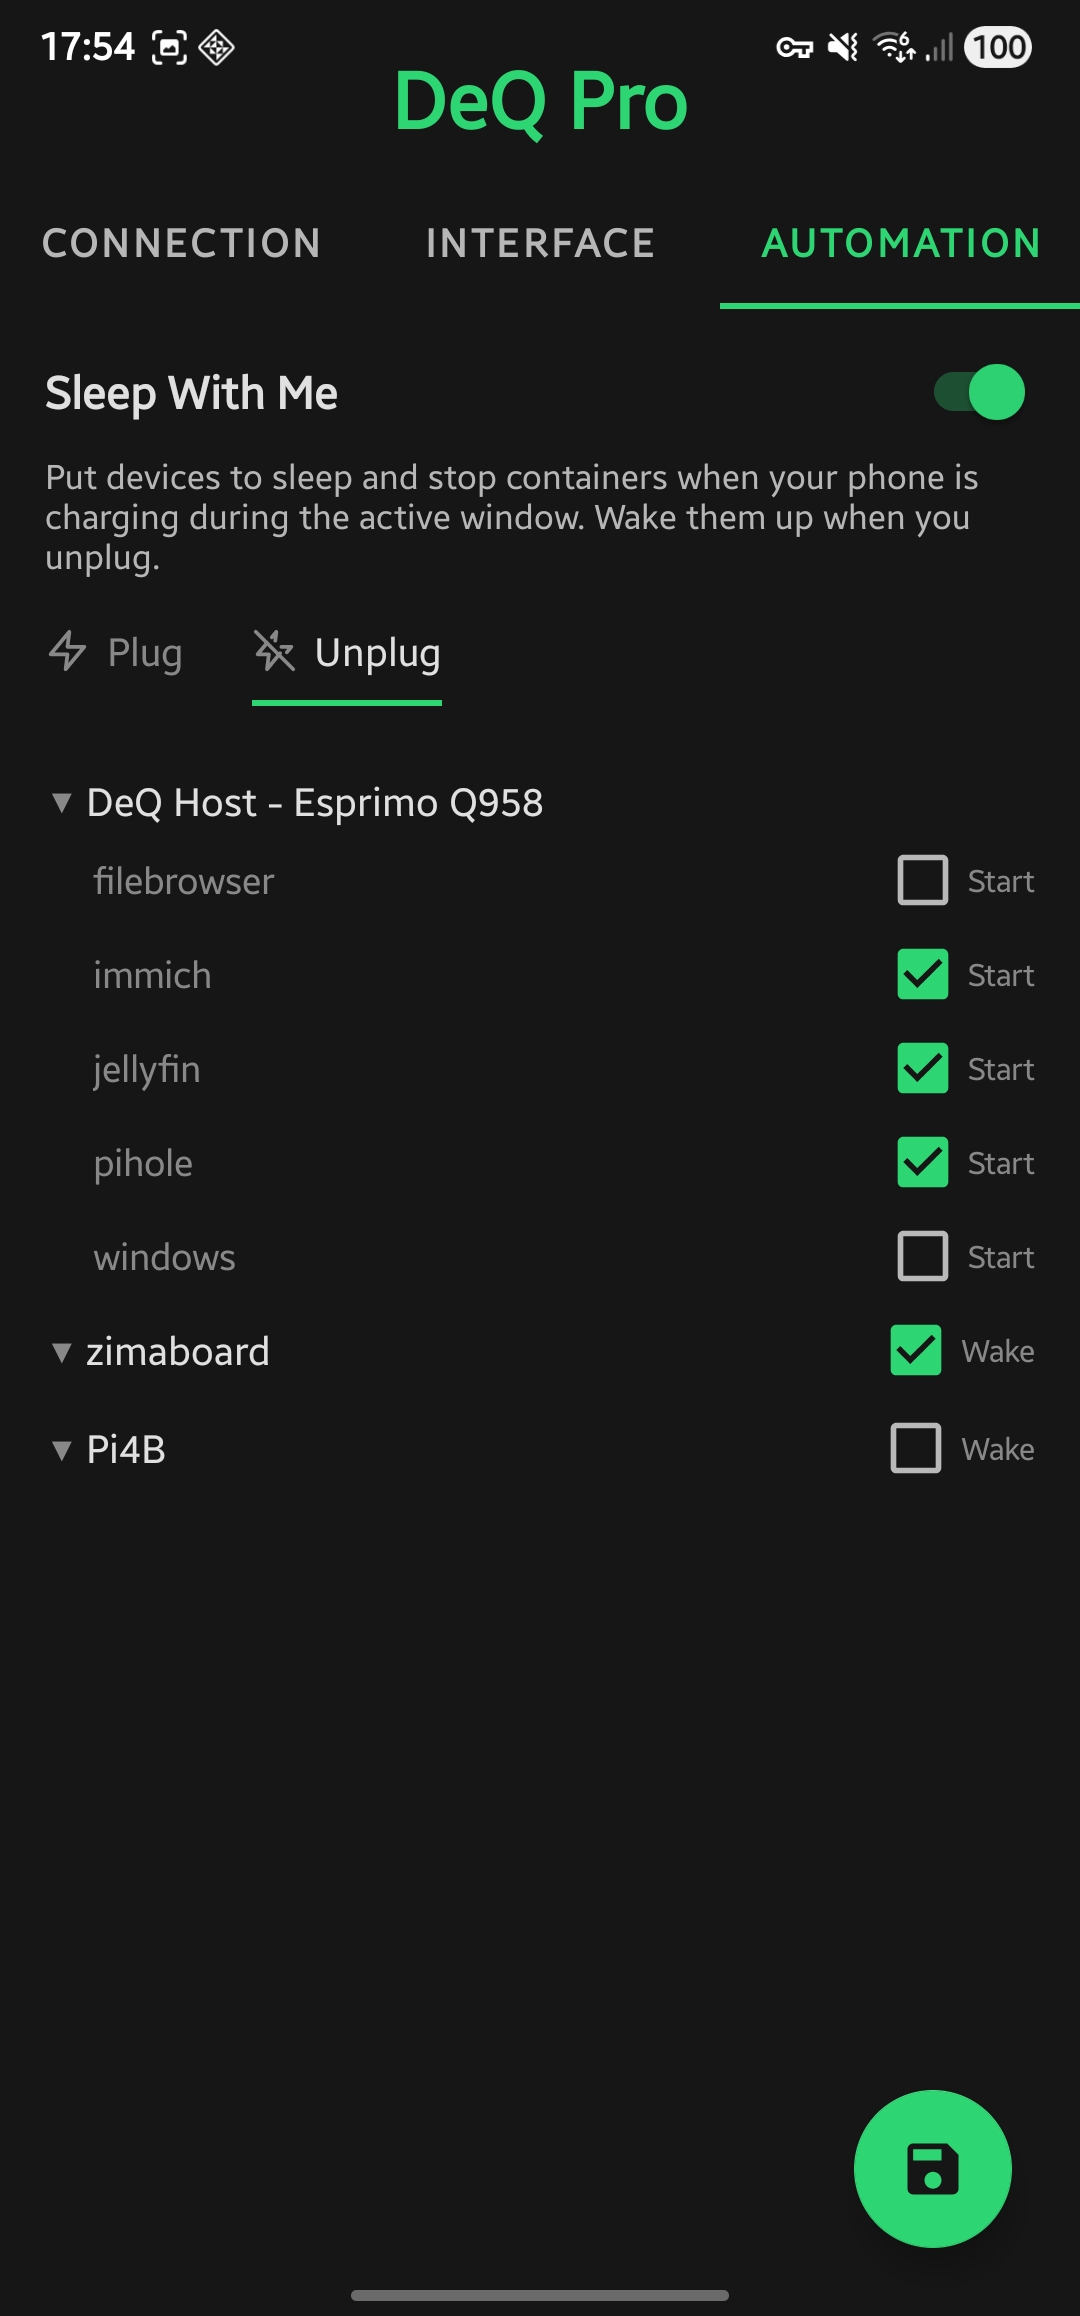
| Unplug tab | Select which containers to start and devices to wake (server via WoL) |
Example workflow
- Set active window to 22:00 - 08:00
- Configure Plug: Stop Jellyfin & Immich containers, suspend server
- Configure Unplug: Wake server, start those containers
- Plug in phone at bedtime → homelab goes quiet
- Unplug phone in morning → everything wakes up
Requirements
- DeQ Pro app
- Battery optimization disabled for DeQ (the app will prompt you)
- SSH access configured for remote devices
- Wake-on-LAN configured for devices you want to wake
DeQ Nodes
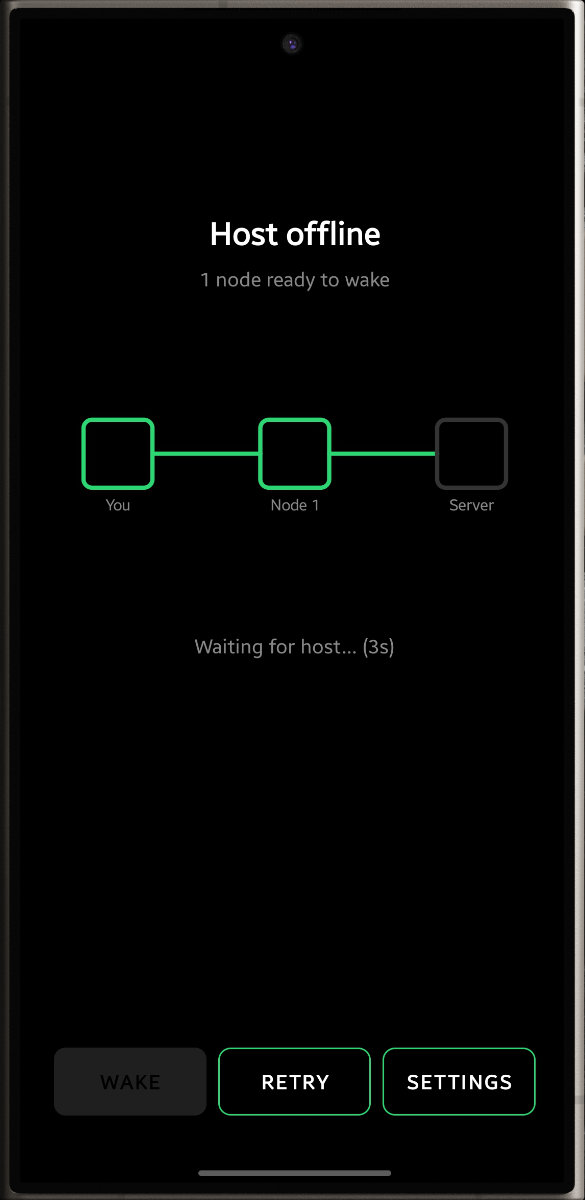
Wake your DeQ host remotely when the server is offline. Nodes are DeQ apps that act as Wake-on-LAN relays for each other.
Why Nodes
WoL packets only work within the local network. When you're away from home and your server is off, you can't wake it directly. Nodes solve this: an old tablet or second phone at home with DeQ installed can send the WoL packet for you.
How it Works
Host reachable?
├─ Yes → Normal operation (WebView)
└─ No → Can I reach the host directly?
    ├─ Yes (local network) → Send WoL directly
    └─ No (remote) → Any nodes available?
        ├─ Yes → Node sends WoL for me
        └─ No → No WoL possible
When you open the app and the host is offline, you see a native "Wake Host" screen. The app first tries direct WoL. If that fails (because you're remote), it asks configured nodes to send the wake signal.
Setup
- In the DeQ app settings, enter your host's MAC address and broadcast address
- On another device at home (tablet, old phone), install DeQ and enable "Act as Node" in settings
- Enter that device's Tailscale IP as a node in your primary app
Note: Nodes communicate via Tailscale. Both devices need Tailscale active.
Requirements
- DeQ app (Free or Pro)
- Host MAC and broadcast address configured
- Node device with DeQ app running and "Act as Node" enabled
- Tailscale (or similar VPN) on both devices
- Battery optimization disabled on the node device
Technical Details
The node runs a lightweight HTTP service on port 9051. It responds to status checks and WoL requests. The service runs as a foreground service with a WakeLock to prevent Android from killing it.
For manufacturer-specific battery optimization settings (Samsung, Xiaomi, etc.), see dontkillmyapp.com.
iOS
Install DeQ as a PWA: Safari → Share → Add to Home Screen. Works like a native app with its own icon. A native iOS app is planned when the project reaches financial sustainability. Apple currently charges $99 for a developer account. Without it we can't release on the appstore.
Desktop App
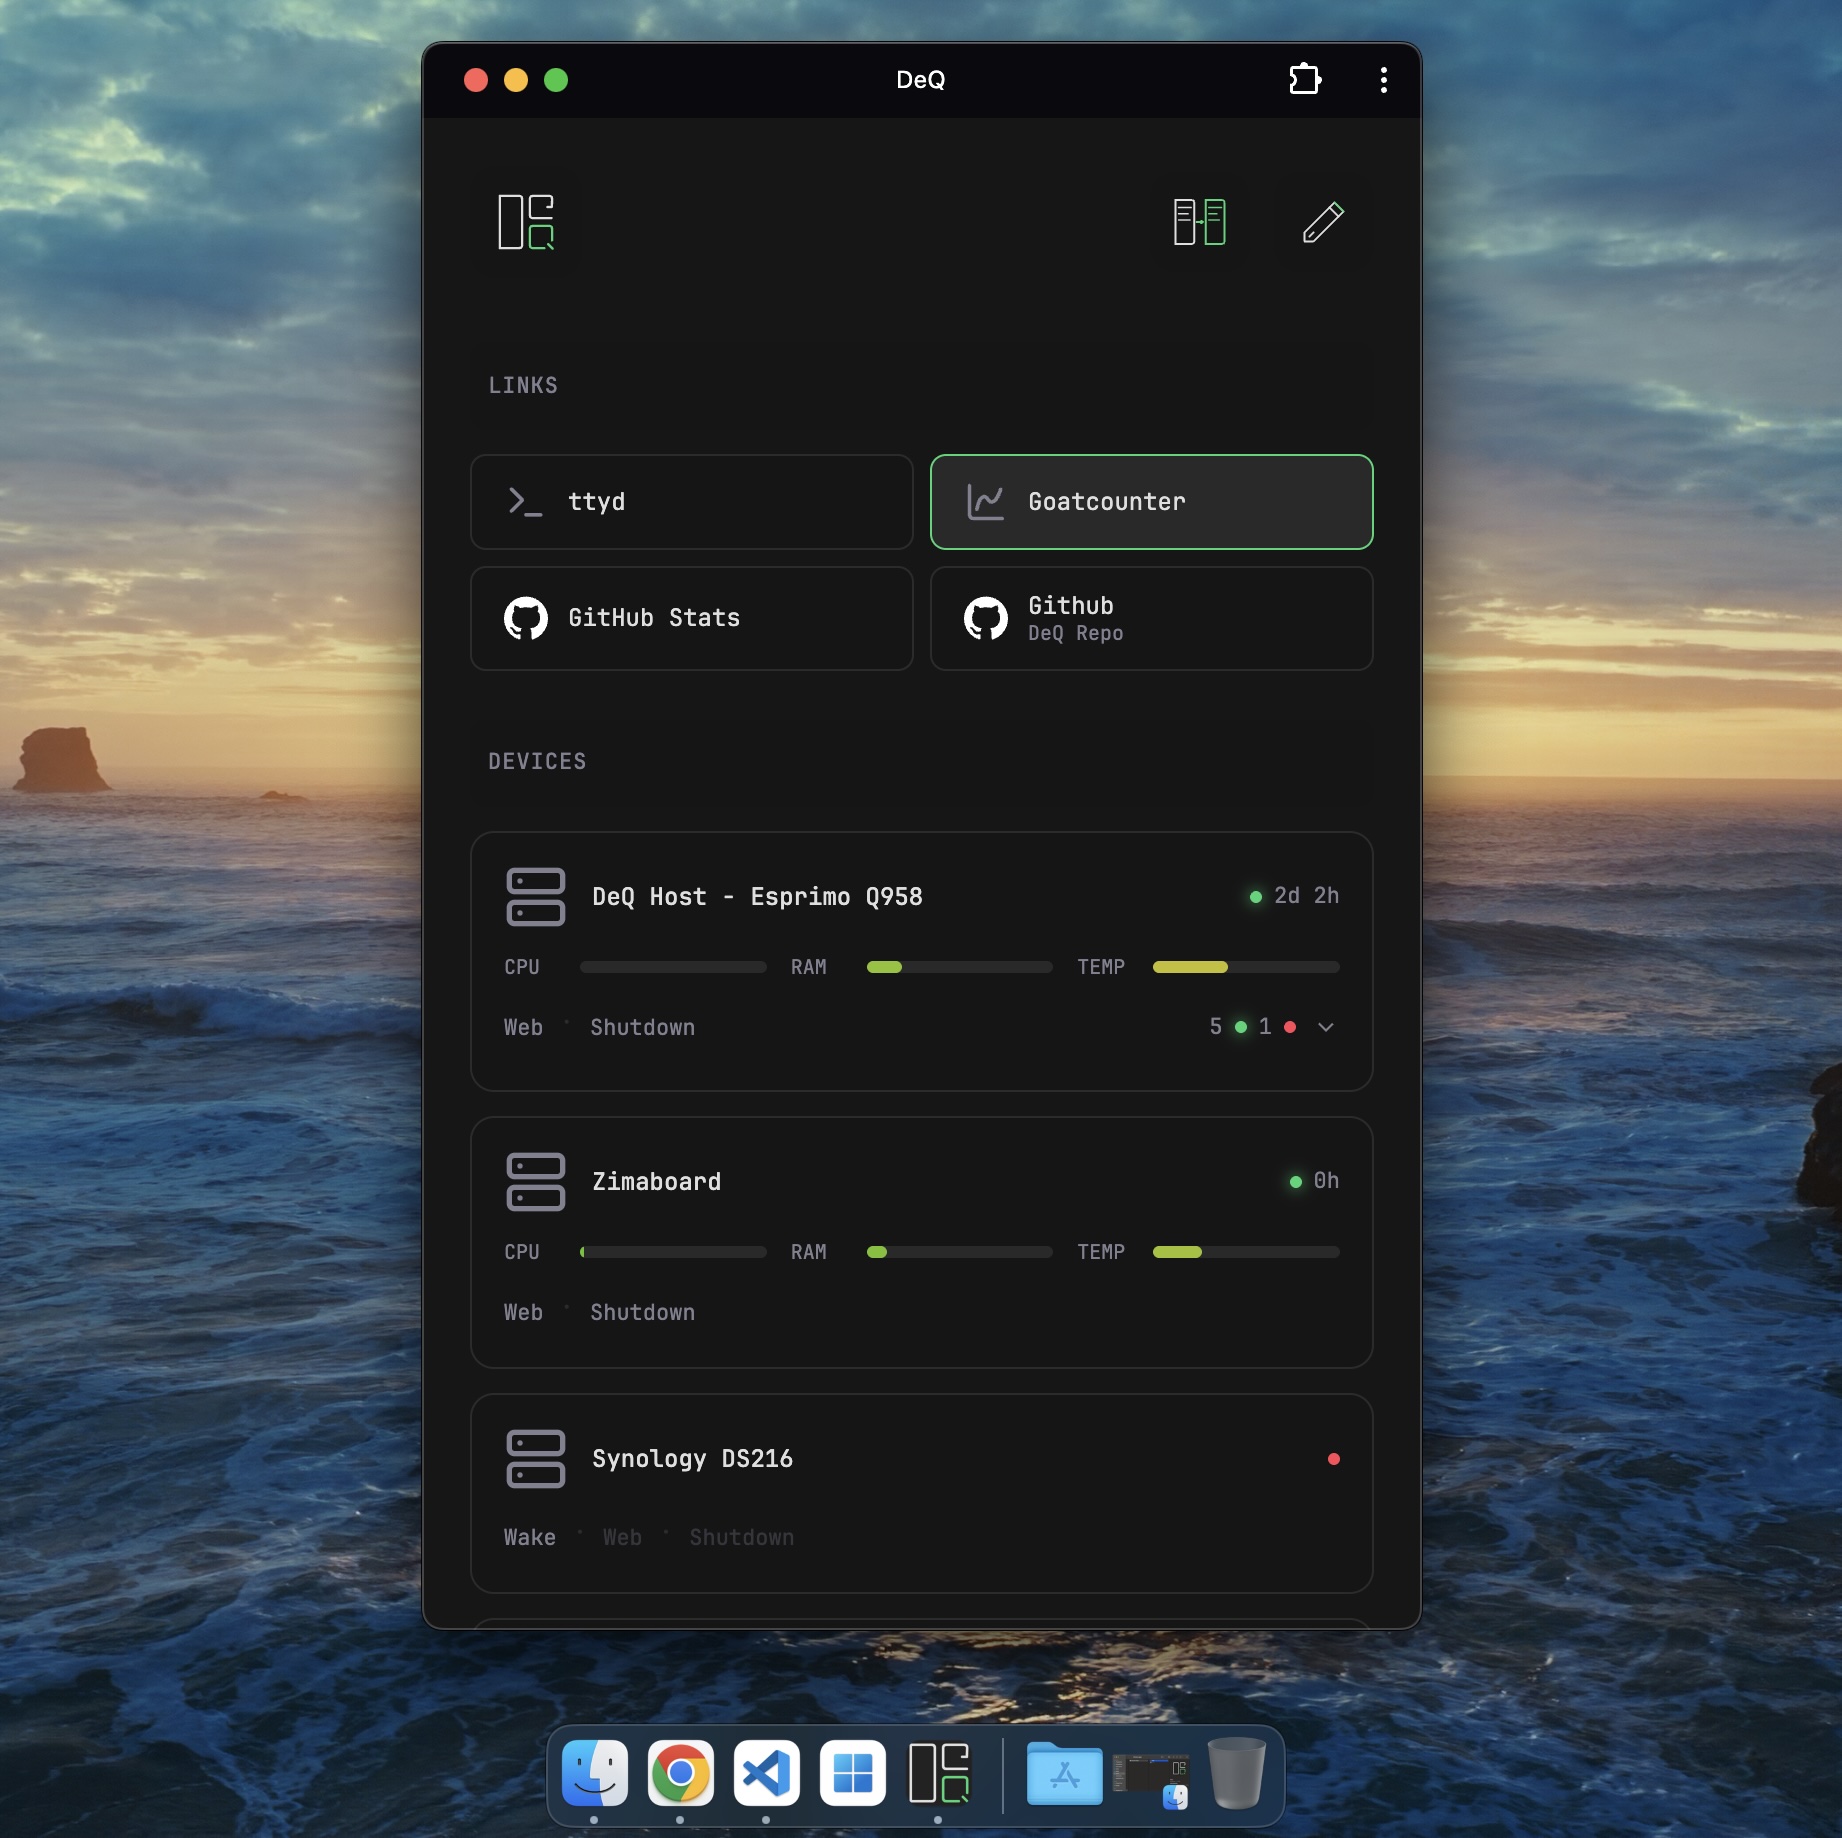
Install DeQ as a PWA for quick access from your dock or taskbar.
- Safari: File → Add to Dock
- Chrome/Edge: Menu → Install as app (or "Cast, save, and share" → "Install page as app")
Service Commands
sudo systemctl status deq      # Check status
sudo systemctl restart deq     # Restart DeQ
sudo journalctl -u deq -f      # View logs
Backup & Restore
All data is stored in /opt/deq/config.json.
Backup: Copy config.json to a safe location.
Restore: Copy it back and restart DeQ.
Updating
To update DeQ, download the latest release and run the installer again:
wget https://github.com/deqrocks/deq/releases/latest/download/deq.zip
unzip deq.zip -d deq && cd deq
sudo ./install.sh
Your config.json is preserved - the installer only overwrites server.py.
Uninstall
sudo systemctl stop deq
sudo systemctl disable deq
sudo rm /etc/systemd/system/deq.service
sudo rm -rf /opt/deq
sudo systemctl daemon-reload
Or as a single command:
sudo systemctl stop deq && sudo systemctl disable deq && sudo rm /etc/systemd/system/deq.service && sudo rm -rf /opt/deq && sudo systemctl daemon-reloadClean up remote devices (optional)
If you configured passwordless sudo on target devices, you can remove it:
sudo rm /etc/sudoers.d/deqHTTP API
DeQ exposes a REST-like API for automation tools like Tasker, MacroDroid, Home Assistant, or custom scripts.
Base URL: http://your-deq-host:5050/api/
Health & Status
| Endpoint | Description |
|---|---|
GET /api/health | Main polling endpoint. Returns all devices, containers, tasks. |
GET /api/version | Returns DeQ version. |
GET /api/config | Full configuration including devices, links, settings. |
Device Operations
| Endpoint | Description |
|---|---|
GET /api/device/{id}/status | Get cached status for a device. |
GET /api/device/{id}/wake | Send Wake-on-LAN packet. |
GET /api/device/{id}/shutdown | Shutdown device via SSH. |
GET /api/device/{id}/suspend | Suspend device via SSH. |
Docker
| Endpoint | Description |
|---|---|
GET /api/device/{id}/docker/{container}/status | Get container status. |
GET /api/device/{id}/docker/{container}/start | Start container. |
GET /api/device/{id}/docker/{container}/stop | Stop container. |
File Manager
| Endpoint | Description |
|---|---|
GET /api/device/{id}/files?path=/ | List files in directory. |
GET /api/device/{id}/download?path=/file | Download a file. |
POST /api/device/{id}/upload?path=/dest | Upload file (multipart). |
POST /api/device/{id}/files | File operations (copy, move, delete, rename, zip, extract). |
Tasks & Actions
| Endpoint | Description |
|---|---|
GET /api/task/{id}/status | Get task status. |
POST /api/task/{id}/run | Manually trigger a task. |
GET /api/quick-action/{id}/run | Execute a quick action script. |
Authentication
| Endpoint | Description |
|---|---|
POST /auth/login | Login with password. Body: {"password": "..."} |
POST /auth/logout | Logout and clear session. |
Response Format
All endpoints return JSON:
{"success": true, ...}
{"success": false, "error": "Error message"}
Examples
Wake a device:
curl http://deq:5050/api/device/nas/wakeStart a container:
curl http://deq:5050/api/device/server/docker/plex/startHome Assistant:
rest_command:
  deq_wake_nas:
    url: "http://deq:5050/api/device/nas/wake"
    method: GET
Extension API
The Extension API allows you to add custom functionality to DeQ without modifying the core server.py. Extensions are Python files that can register custom dashboard sections, use DeQ's infrastructure (SSH, WoL, Docker control), and integrate seamlessly with the UI. Extensions allow to make DeQ whatever you want it to be.
Security Considerations
⚠️ Important: Extensions run with full server privileges. They can:
- Execute arbitrary commands on configured devices via SSH
- Read/write files as the DeQ user
- Access all configuration data
Only install extensions from trusted sources!
How It Works
- Discovery: At server startup, DeQ scans
/opt/deq/extensions/for.pyfiles - Loading: Each file is executed and its
register(deq)function is called - Rendering: Your render function is called every 5 seconds with the health poll
- Integration: Extensions appear as normal sections with drag & drop reordering and visibility toggle
Directory Structure
/opt/deq/
├── server.py           # Core (untouched by extensions)
├── config.json         # User config
└── extensions/         # Extension directory
    ├── weather.py
    ├── dashboard.py
    └── ...
Creating an Extension
Create a .py file in /opt/deq/extensions/. The file must define a register() function:
# /opt/deq/extensions/weather.py

def register(deq):
    """Called once when extension is loaded."""
    deq.register_section(
        id="weather",
        title="Weather",
        icon="cloud-sun",
        render=render_weather
    )

def render_weather():
    """Called on every poll to render section content."""
    # Your logic here
    return 'Current: 22°C'
DeQ API Object
The deq object passed to your register function provides:
Properties (Read-only)
| Property | Returns |
|---|---|
deq.devices | List of all devices from config |
deq.config | Full config dict (read-only copy) |
Device Status
| Method | Description |
|---|---|
deq.device_status(device_id) | Get cached status dict for a device |
deq.is_online(device_id) | Returns True/False/None if device is online |
Device Actions
| Method | Description |
|---|---|
deq.wol(device_id) | Send Wake-on-LAN packet |
deq.shutdown(device_id) | Shutdown device via SSH |
deq.suspend(device_id) | Suspend device via SSH |
deq.docker(device_id, container, action) | Control Docker container (action: "start", "stop", "status") |
SSH Execution
| Method | Description |
|---|---|
deq.ssh(device_id, command) | Execute command via SSH (or local shell for host). Returns (success: bool, stdout: str, stderr: str) |
Registration
| Method | Description |
|---|---|
deq.register_section(id, title, icon, render) | Register a dashboard section. render is a callable that returns HTML string |
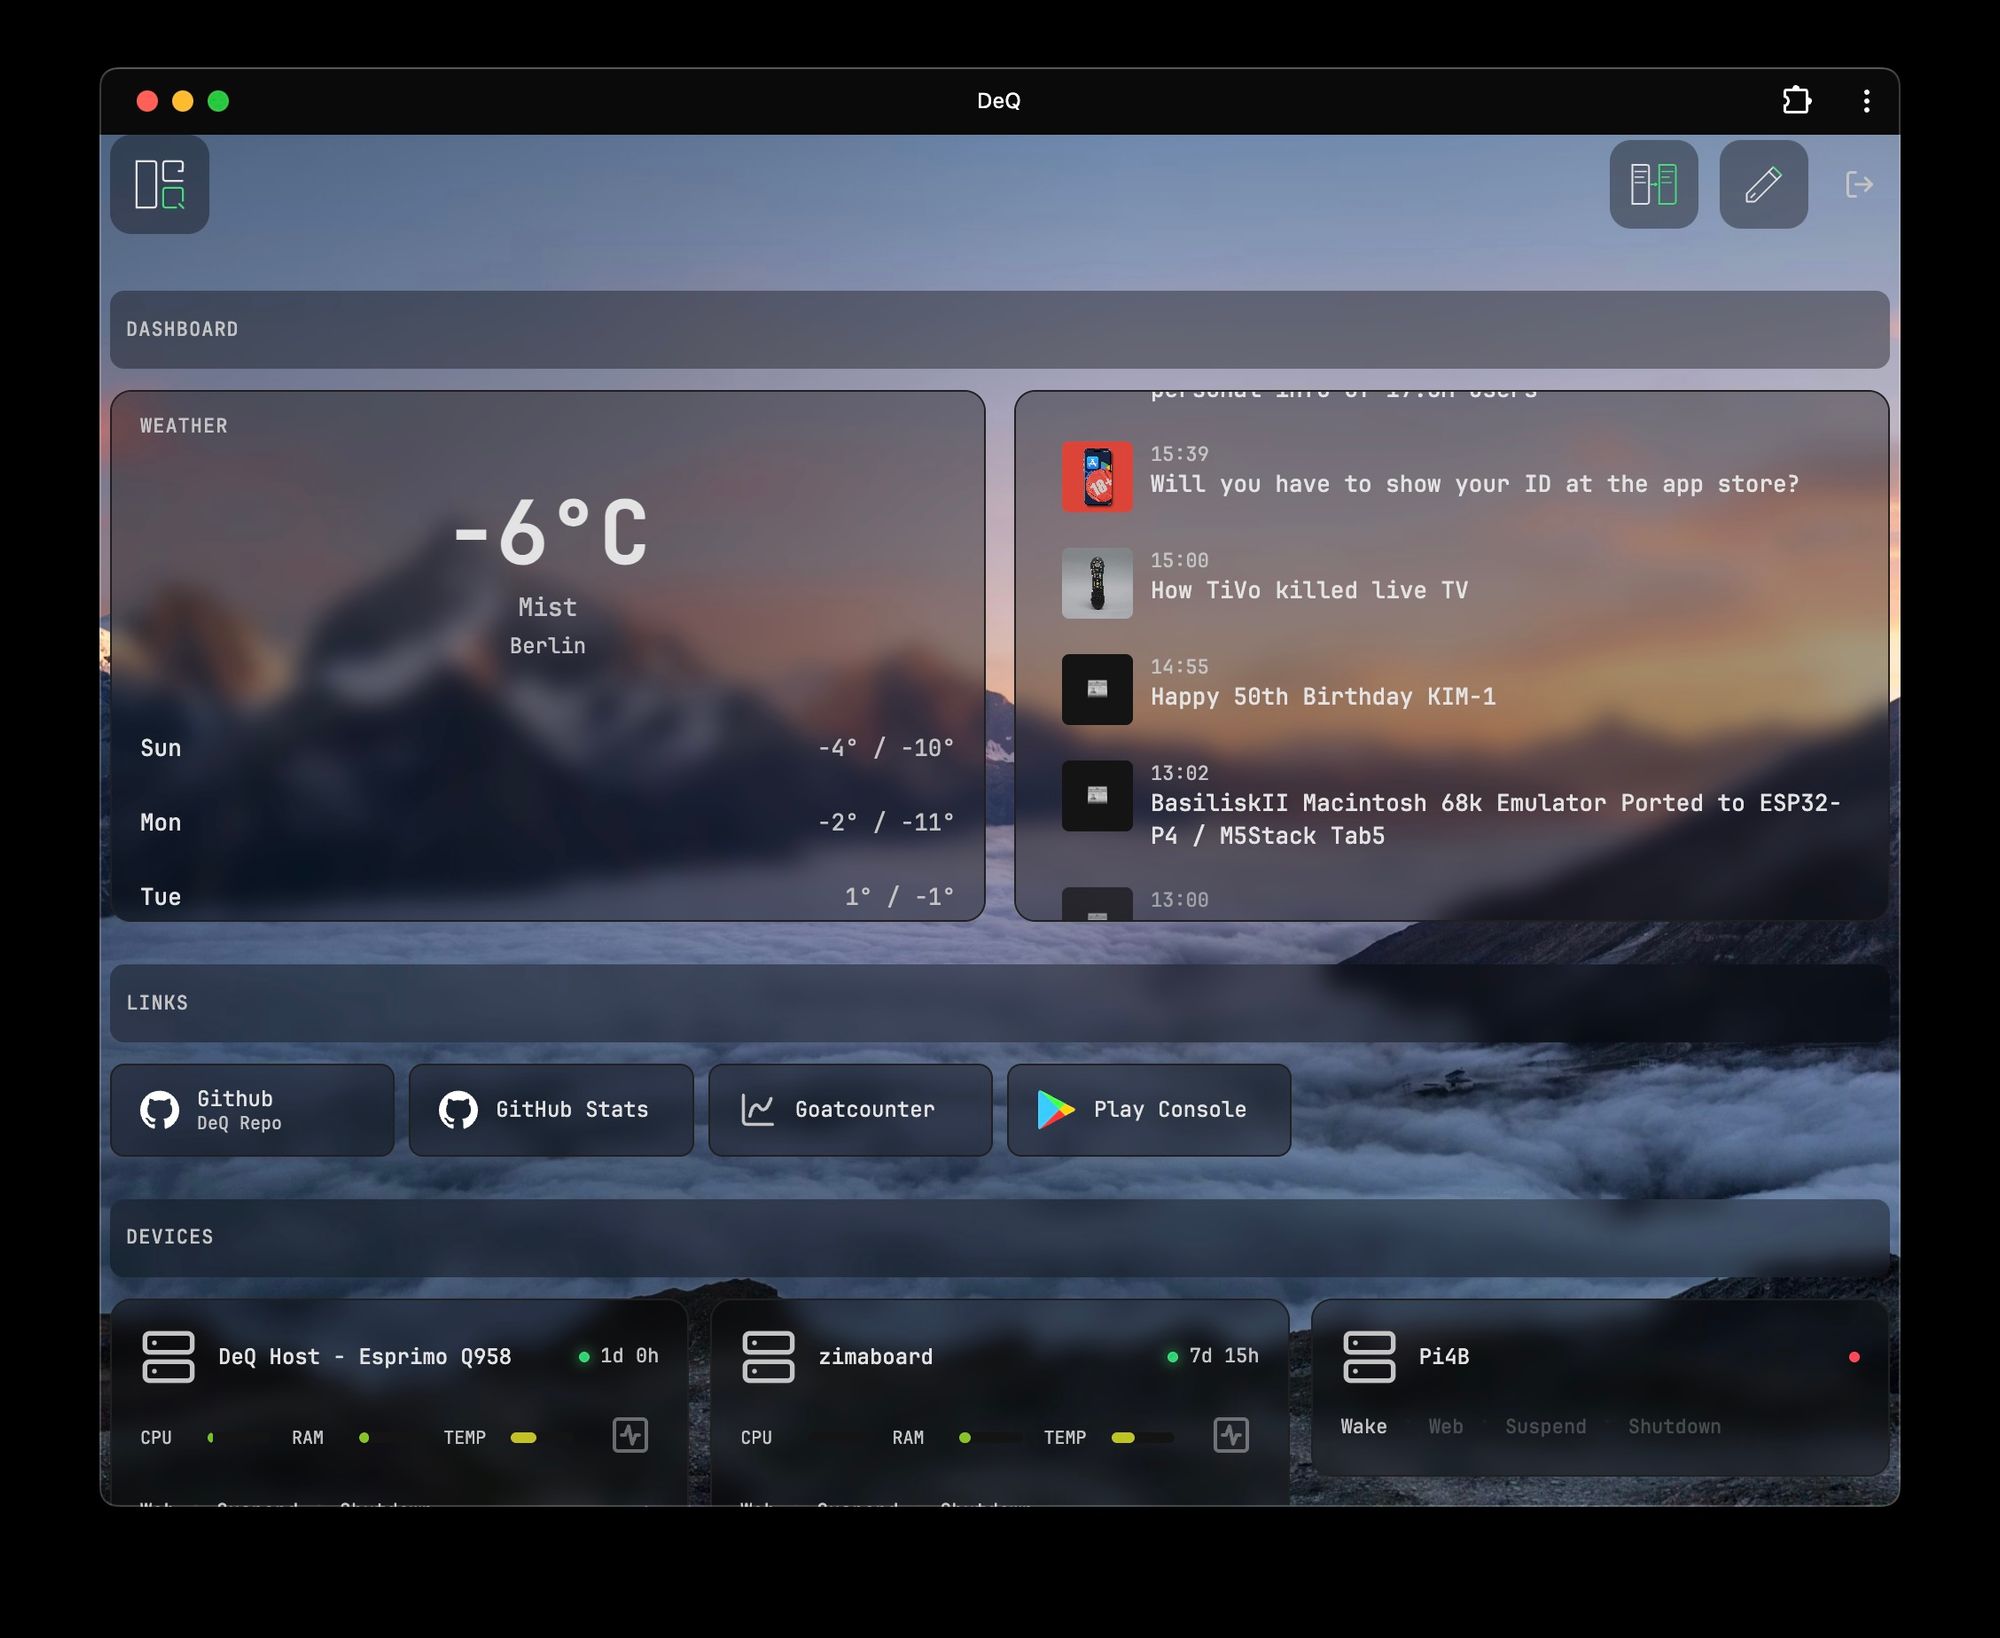
Example: Weather Widget
A simple weather widget demonstrating HTTP requests, caching, and HTML rendering:
# /opt/deq/extensions/weather.py
import urllib.request
import json

CITY = "Berlin"
CACHE = {"data": None, "time": 0}

def register(deq):
    """Called once when extension loads. Register your section here."""
    deq.register_section(
        id="weather",              # Unique section ID
        title="Weather",            # Display name in UI
        icon="cloud-sun",           # Lucide icon name
        render=render_weather       # Function called every 5 seconds
    )

def render_weather():
    """Called by frontend every 5 seconds. Must return HTML string."""
    import time

    # Cache for 10 minutes (600 seconds) to avoid API rate limits
    if CACHE["data"] and time.time() - CACHE["time"] < 600:
        return format_weather(CACHE["data"])

    try:
        # Fetch weather data from wttr.in API (no API key needed)
        url = f"https://wttr.in/{CITY}?format=j1"
        with urllib.request.urlopen(url, timeout=5) as r:
            data = json.loads(r.read())

            # Update cache with new data
            CACHE["data"] = data
            CACHE["time"] = time.time()
            return format_weather(data)
    except Exception as e:
        # On error, return old cache if available
        if CACHE["data"]:
            return format_weather(CACHE["data"])
        return '<div style="padding:1rem;opacity:0.5">Weather unavailable</div>'

def format_weather(data):
    """Format weather data into HTML string."""
    current = data["current_condition"][0]
    temp = current["temp_C"]
    desc = current["weatherDesc"][0]["value"]

    return f'''
        <div style="text-align:center;padding:1rem;">
            <div style="font-size:2rem;font-weight:600">{temp}°C</div>
            <div style="opacity:0.7">{CITY} · {desc}</div>
        </div>
    '''
Key Concepts:
- register() - Called once at startup to register your section
- render() - Called every 5 seconds, must return HTML string
- Caching - Store responses to avoid hitting APIs on every poll
- Error handling - Return old cache on errors instead of error messages
Example Extensions
Several example extensions are included to help you get started. You can find them in /opt/deq/extensions/ or check the source code for reference:
- weather.py - Simple weather display with caching
- overview.py - System overview across all devices (online/offline, avg CPU)
- dashboard.py - Weather + RSS feeds in a responsive 2-column layout
- container_status.py - Docker container status overview
- container_updates.py - Check for Docker image updates
Finding Device IDs
Many extension functions (like ssh(), docker(), device_status()) require a device ID. Here's how to find them:
Option 1: Health API (Recommended)
curl http://your-deq-host:5050/api/health | python3 -m json.tool | grep -A3 '"devices"'Example output:
"devices": [
  {
    "id": "host",
    "name": "DeQ Host - Esprimo Q958",
    "online": true
  },
  {
    "id": "fe3996b4-d1a5-47d6-a87e-6179a31f527f",
    "name": "zimaboard",
    "online": true
  }
]
Option 2: Config File
cat /opt/deq/config.json | grep -A2 '"id"'Use the "id" value (e.g., "host", "fe3996b4-d1a5-47d6-a87e-6179a31f527f") in your extension.
Styling Guidelines
Extensions should integrate seamlessly with DeQ's theming. Use CSS variables and follow these patterns:
- Colors:
var(--bg-secondary),var(--text-primary),var(--accent),var(--border) - Cards:
background: var(--bg-secondary); border: 1px solid var(--border); border-radius: 12px; padding: 16px; - Typography: Font size 11-13px for most content, 500 weight for headings
- Effects:
backdrop-filter: blur(var(--glass-blur, 0px))for glass effect
Performance Tips
- Cache external data: Store API responses with timestamps to avoid rate limits
- Handle errors gracefully: Return old cache on fetch errors instead of showing error messages
- Avoid blocking: Keep fetch operations fast (< 5 seconds timeout)
Reloading Extensions
After adding/modifying an extension, restart DeQ:
sudo systemctl restart deqTips
- Use caching to avoid rate limits (e.g., weather APIs)
- Check device online status before executing commands
- Return user-friendly error messages in your HTML
- Test your extension manually with
python3 /opt/deq/extensions/yourfile.py
Community Extensions
Extensions are Python files that live in /opt/deq/extensions/ and add custom sections to the DeQ web interface. They have full access to DeQ's SSH infrastructure and device data.
Browse community-built extensions in /community extensions/ on GitHub.
Contributing
If you built a useful extension, consider sharing it with the community.
What works well: Weather widgets, RSS readers, service status dashboards, custom integrations.
How to share:
- GitHub: Fork the repository, add your extension to
/community extensions/, open a PR. Seecontribution.mdin that folder for guidelines and templates. - Email: Zip your extension and send it to dev@deq.rocks.
Note: Only install extensions from trusted sources. Extensions run with full server privileges.